Sprinkler Controller
The sprinkler controller component aims to behave like a sprinkler/irrigation valve controller,
much like those made by companies such as Rain Bird or Hunter. It does so by automating control of a
number of switch components, each of which would typically be used to control
an individual electric valve via a relay or other switching device. It provides a number of features
you’d expect of a sprinkler controller, including:
-
Virtually any number of zones (sections of the sprinkler system) per controller instance, limited only by available memory and/or GPIO (including I/O expanders!) pin availability on the ESP
-
The ability to run:
- One or more full cycles (iterations through all zones) of the system
- Only a single zone
-
Automatic cycle repeating
-
A multiplier value to proportionally increase or decrease the run duration for all zones
-
Support for pumps/main valves located upstream of distribution valves
-
Pausing and resuming a zone/cycle
-
Iterating through zones in forward or reverse order
-
Support for both latching (“pulsed”) and non-latching valves (which can be arbitrarily mixed!)
It reaches even further, however, offering several more advanced features, as well:
-
Multiple sprinkler controller instances can operate simultaneously on a single (ESP) device
-
Multiple pumps, each of which may be shared across controller instances
-
Enable/disable switches for each individual zone, allowing zones to be omitted from full cycles of the system
-
A valve/zone queuing mechanism aimed at providing advanced support for automation
-
Several valve management strategies to accommodate varying types of hardware/installations:
- Adjustable “valve open delay” to help ensure valves are fully closed before the next one is opened
- Adjustable “valve overlap” to help minimize banging of pipes due to water hammer
- Adjustable delay intervals to coordinate pump starting and stopping relative to distribution valve opening and closing
NOTE
While the term “pump” is used throughout this document, the device controlled need not be a physical pump. Instead, it may simply be another electric valve located upstream of distribution valves (often known in the industry as a “main” or “master” valve). The pump or upstream valve simply controls the water supply to other downstream valves.
# Example minimal configuration entry# (...but please see more detailed examples below!)sprinkler: - id: sprinkler_ctrlr main_switch: "Sprinklers" auto_advance_switch: "Sprinklers Auto Advance" valves: - valve_switch: "Front Lawn" enable_switch: "Enable Front Lawn" run_duration: 1800s valve_switch_id: lawn_sprinkler_valve_sw0 - valve_switch: "Back Lawn" enable_switch: "Enable Back Lawn" run_duration: 900s valve_switch_id: lawn_sprinkler_valve_sw1Please see the Controller Examples section below for extensive, detailed configuration examples that are ready for you to copy and paste!
Configuration variables
Section titled “Configuration variables”-
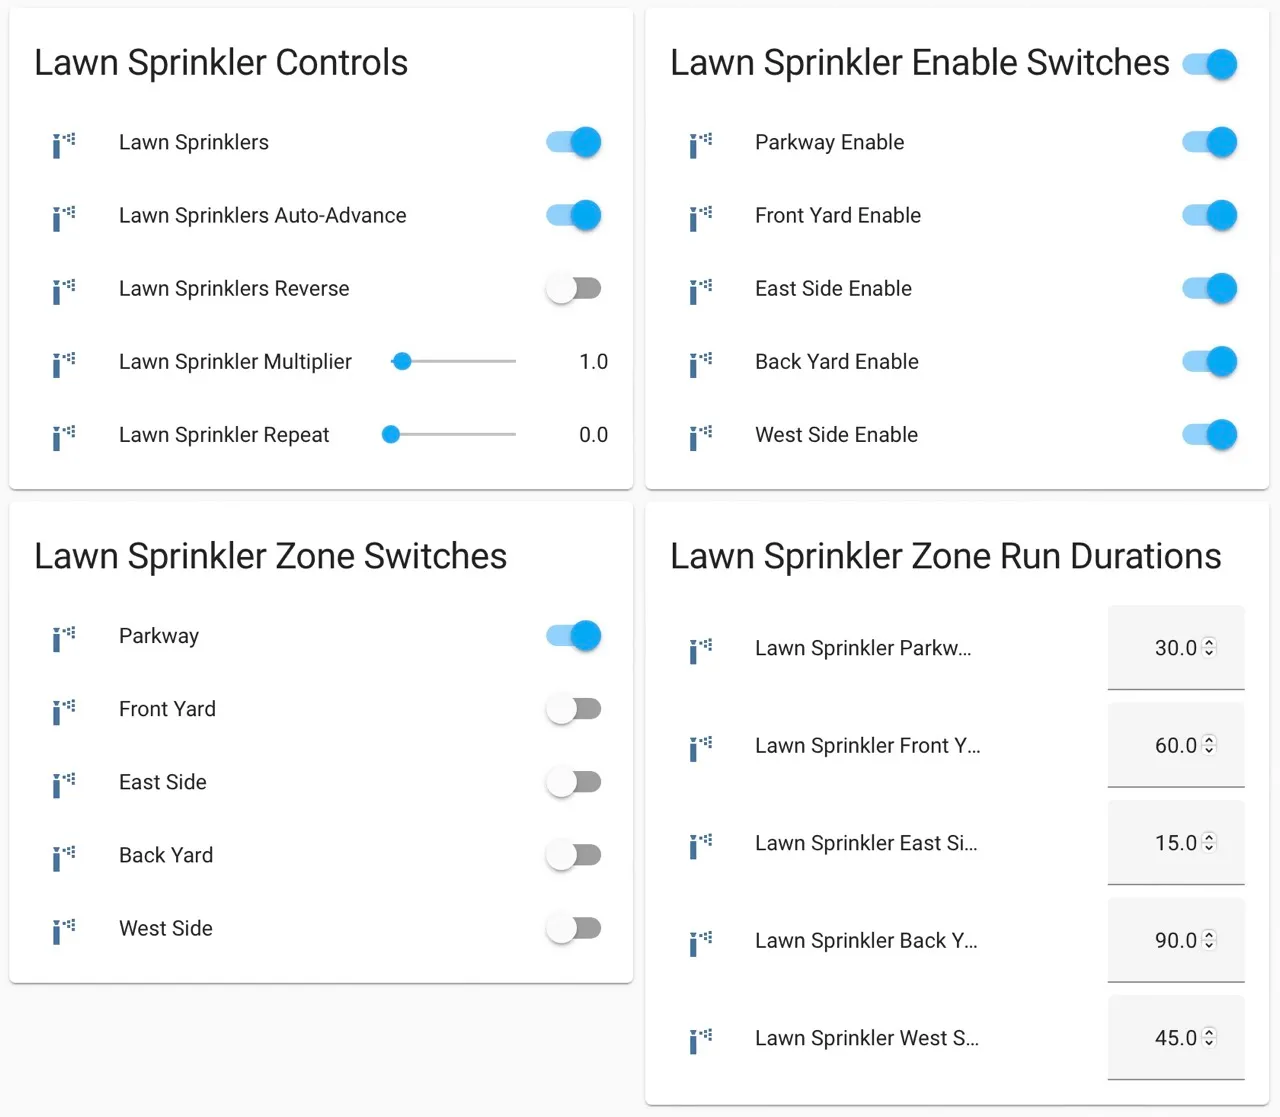
main_switch (Optional, string): Required with more than one valve. The name for the sprinkler controller’s main switch as it will appear in the front end. This switch, when turned on, calls the
sprinkler.resume_or_start_full_cycleaction; when turned off, it calls thesprinkler.shutdownaction (see below). It will appear to be “on” when any valve on the controller is active. This switch will not appear in the front end if the controller is configured with only one valve. -
auto_advance_switch (Optional, string): Required with more than one valve. The name for the sprinkler controller’s “auto-advance” switch as it will appear in the front end. When this switch is turned on while a valve is active, when the valve’s
run_durationis reached, the sprinkler controller will automatically advance to the next enabled valve as a part of a “full cycle” of the system. When turned off, the sprinkler controller will shut down after the active valve’srun_durationis reached (unless there are valves in the queue — see The Sprinkler Controller Queue section below for more detail). This switch will not appear in the front end if the controller is configured with only one valve. -
manual_selection_delay (Optional, Time): The amount of time the controller should wait to activate a valve after the
next_valveandprevious_valveactions are called. Useful if the control interface consists of only forward/reverse buttons as the button(s) may be pressed multiple times to make the selection. -
queue_enable_switch (Optional, string): The name for the sprinkler controller’s queue enable switch as it will appear in the front end. When this switch is turned on or not provided, the controller will select the next valve/zone to run based on the contents of the queue; the queue takes precedence over valves that would otherwise run as a part of a full cycle of the system (when auto-advance is on/enabled). See The Sprinkler Controller Queue section below for more detail.
-
reverse_switch (Optional, string): The name for the sprinkler controller’s reverse switch as it will appear in the front end. When this switch is turned on, the controller will iterate through the valves in reverse order (last-to-first as they appear in the controller’s configuration). When this switch is turned off or not provided, the controller will iterate through the valves first-to-last. This switch will not appear in the front end if the controller is configured with only one valve.
-
standby_switch (Optional, string): The name for the sprinkler controller’s standby switch as it will appear in the front end. When this switch is turned on, the controller will not start any valves. This can result in confusing/unexpected behavior if there is no visual indication of this condition!
-
valve_open_delay (Optional, Time): The minimum delay in seconds that should be inserted between (distribution) valve switching — in other words, the amount of time that must elapse between one valve switching off and the next one switching on. Useful for systems with valves which depend on sufficient water pressure to close. May not be used with
valve_overlap. -
valve_overlap (Optional, Time): The amount of time in seconds that the current valve and the next valve should run simultaneously as the next valve/zone starts up. This may help prevent pipes from banging as valves close. May not be used with
valve_open_delay. -
pump_switch_off_during_valve_open_delay (Optional, boolean): If set to
true, the pump will be switched off during thevalve_open_delayinterval; otherwise, it remains on. This may only be specified whenvalve_open_delayis configured (see above). Defaults tofalse. -
pump_start_pump_delay (Optional, Time): The delay in seconds from when a distribution valve is opened to when the associated pump is activated. Useful to ensure pressure does not build up from running the pump when no distribution valves are open. May not be used with
pump_start_valve_delay. -
pump_start_valve_delay (Optional, Time): The delay in seconds from when a pump is started to when the associated distribution valve is opened. Useful for systems where distribution valves require sufficient pressure to fully/quickly close. May not be used with
pump_start_pump_delay. -
pump_stop_pump_delay (Optional, Time): The delay in seconds from when a distribution valve is closed to when the respective pump is deactivated. Useful for systems where distribution valves require sufficient pressure to fully/quickly close. May not be used with
pump_stop_valve_delay. -
pump_stop_valve_delay (Optional, Time): The delay in seconds from when a pump is deactivated to when the respective distribution valve is closed. Useful to ensure pressure does not build up from running the pump when no distribution valves are open or to allow the main line out to distribution valves to drain. May not be used with
pump_stop_pump_delay. -
multiplier_number (Optional, string): The name of the number component that should be presented to the front end (Home Assistant) to enable control of the sprinkler controller’s
multipliervalue. See Using the Sprinkler Controller’s Numbers below for more detail. -
repeat_number (Optional, string): The name of the number component that should be presented to the front end (Home Assistant) to enable control of the sprinkler controller’s
repeatvalue. May not be used withrepeat. See Using the Sprinkler Controller’s Numbers below for more detail. -
repeat (Optional, int): The number of times a full cycle should be repeated. Defaults to 0. May not be used with
repeat_number. -
next_prev_ignore_disabled (Optional, boolean): Set to
trueto causesprinkler.next_valveaction andsprinkler.previous_valveaction to skip over valves that are not enabled. Defaults tofalse. -
id (Optional, ID): Manually specify the ID used for code generation. While optional, this is necessary to identify the controller instance (particularly in cases where more than one is defined) when calling controller actions (see below) such as
start_full_cycleorshutdown. -
valves (Required, list): A list of valves the controller should use. Each valve consists of:
-
enable_switch (Optional, string): The name for the switch component to be used to enable this valve to be run as a part of a full cycle of the system. When this switch is turned off, the valve will be excluded from a full cycle of the system. When this switch is turned on or not provided, the controller will include the valve in a full cycle of the system.
-
valve_switch (Required, string): The name for the switch component to be used to control the valve for this part of the sprinkler system (often referred to as a “zone”). When this switch is turned on, the controller’s “auto-advance” feature is disabled and it will activate the associated valve for its
run_durationmultiplied by the controller’s multiplier value. When this switch is turned off, thesprinkler.shutdownaction is called (see below). -
pump_switch_id (Optional, Switch): This is the switch component to be used to control the valve’s pump or upstream electric valve. Typically this would be a GPIO switch wired to control a relay or other switching device which in turn would activate the respective pump/valve. For latching valves/pumps, use an H-Bridge switch. It is not recommended to expose this switch to the front end; please see An Important Note about GPIO Switches and Control below for more detail.
-
run_duration_number (Optional, string): The name of the number component that should be presented to the front end (Home Assistant) to enable control of the valve’s
run_durationvalue. May not be used withrun_duration. See Using the Sprinkler Controller’s Numbers below for more detail. Pro tip: Want times in minutes? Addunit_of_measurement: minto the number configuration. See Using the Sprinkler Controller’s Numbers for more detail. -
run_duration (Optional, Time): Required when
run_duration_numberis not provided. The duration in seconds this valve should remain on/open after it is activated. When a given valve is activated, the controller’s multiplier value is multiplied by this value to determine the actual run duration for the valve, thus allowing the run duration for all valves/zones to be proportionally increased or decreased as desired. May not be used withrun_duration_number. -
valve_switch_id (Optional, Switch): This is the switch component to be used to control the valve that operates the given section or zone of the sprinkler system. Typically this would be a GPIO switch wired to control a relay or other switching device which in turn would activate the respective valve. For latching valves, use an H-Bridge switch. It is not recommended to expose this switch to the front end; please see An Important Note about GPIO Switches and Control below for more detail.
-
An Important Note about GPIO Switches and Control
Section titled “An Important Note about GPIO Switches and Control”The savvy and/or seasoned ESPHome user will quickly realize that pump_switch_id and valve_switch_id (as described
above) are really just pointers to other switches elsewhere in the ESPHome yaml configuration.
It might seem reasonable to assume that these switches (typically GPIO switches or H-Bridge switches) may be used to switch the various sprinkler zones on and off, however, this is not the case. It’s important to note that the sprinkler controller provides a switch for each configured zone — ultimately, this switch is to be used to switch any given zone on or off, not the underlying switch the zone is configured with.
Keep in mind that a switch directly controls its associated hardware (GPIO pins, H-Bridge circuits, etc.). While it’s technically feasible to “override” this behavior, it might not always be desirable. For example, if you wanted to control the state of the switch manually during testing of your system/configuration, this would make doing so impossible (or at least more difficult than necessary), presenting other complications. Ultimately, flexibility is key, as we’ve learned from any number of conversations on the ESPHome Discord server.
As mentioned in the introduction, the sprinkler controller automates control of the switches you provide it with — it does not “override” control of these switches or alter how they behave beyond simply switching them on or off as required based on the configured scheduling.
So why not just use the underlying switches to control the various sprinkler zones directly? As it relates to the sprinkler controller itself, the primary reason relates to state — that is, we need to be able to ensure that the switch state(s) are kept consistent with the configuration of the sprinkler controller. While it’s less important for systems that simply consist of one valve per zone, it becomes very important for systems with some additional complexity. Consider the example of a system with a pump and multiple distribution valves attached to said pump; the controller in this case is configured to switch the pump off three seconds before switching off any given distribution valve. If you suddenly manually switch off an underlying switch connected to one of these distribution valves, what happens to the pump? What should the sprinkler controller do? Should it switch the distribution valve back on?…or maybe just switch the pump off, too? In either case, based on its configuration, the pump was supposed be shut down before the valve, but you just went and turned off the valve. The pump could be damaged. There are many other similar situations such as this that may occur, the simplest of which is little more than ensuring that any given valve is switched off after some duration and does not remain on/open perpetually.
In summary, to ensure that your sprinkler controller consistently operates as expected:
-
Only use the switches provided by the sprinkler controller component to switch any given sprinkler zone on or off.
-
Do not use the underlying switches (GPIO, H-Bridge, etc.) you have in your configuration to control sprinkler zones/valves outside of initial testing of your device configuration.
-
To help prevent accidents, it’s probably best if the underlying switches for each sprinkler zone are not exposed to the front end. This can be accomplished in two ways:
- Do not provide a
name:parameter to your switches, or - Add
internal: trueto each of your switch configurations
- Do not provide a
These simple configuration tweaks will help prevent any number of errors (human, automation, or otherwise) and may help to avert disaster!
Controller Actions
Section titled “Controller Actions”sprinkler.start_full_cycle Action
Section titled “sprinkler.start_full_cycle Action”Starts a full cycle of the system. This enables the controller’s “auto-advance” feature and disables
the queue. The controller will iterate through all enabled valves/zones. They will each run for their
configured run_duration multiplied by the controller’s multiplier value. Note that if NO valves
are enabled when this action is called, the controller will automatically enable all valves.
on_...: then: - sprinkler.start_full_cycle: sprinkler_ctrlrsprinkler.start_from_queue Action
Section titled “sprinkler.start_from_queue Action”Starts the controller running valves from its queue. If no valves are in the queue, this action does
nothing; otherwise, this disables the controller’s “auto-advance” feature so that only queued
valves/zones will run. Queued valves will remain on for either the amount of time specified in the
queue request or for their configured run_duration multiplied by the controller’s multiplier value
(if the queue request run duration is not specified or is zero). Note that queued valves ignore whether
the valve is enabled; that is, queued valves will always run once the controller is started, unless, of
course, the queue is (manually) cleared prior to the queue reaching them. Also note that, at present,
the queue has a hard-coded limit of 100 entries to limit memory use.
See The Sprinkler Controller Queue section below for more detail.
on_...: then: - sprinkler.start_from_queue: id: sprinkler_ctrlrsprinkler.start_single_valve Action
Section titled “sprinkler.start_single_valve Action”Starts a single valve. This disables the controller’s “auto-advance” and queue features so that only this valve/zone
will run. The valve will remain on for the specified duration or (if run_duration is not specified or is zero) for
its configured run_duration multiplied by the controller’s multiplier value. Note that this action ignores whether
the valve is enabled; that is, when called, the specified valve will always run. Valves are numbered in the order they
appear in the sprinkler controller’s configuration starting at zero (0).
on_...: then: - sprinkler.start_single_valve: id: sprinkler_ctrlr valve_number: 0 run_duration: 600s # optionalsprinkler.shutdown Action
Section titled “sprinkler.shutdown Action”Initiates a shutdown of all valves/the system, respecting any configured pump or valve stop delays.
on_...: then: - sprinkler.shutdown: sprinkler_ctrlrsprinkler.next_valve Action
Section titled “sprinkler.next_valve Action”Advances to the next valve (numerically). If manual_selection_delay is configured, the controller
will wait before activating the selected valve. If no valve is active, the first valve (as they appear
in the controller’s configuration) will be started. Setting next_prev_ignore_disabled to true
will cause this action to skip valves that are not enabled via their valve enable switch (see above).
on_...: then: - sprinkler.next_valve: sprinkler_ctrlrsprinkler.previous_valve Action
Section titled “sprinkler.previous_valve Action”Advances to the previous valve (numerically). If manual_selection_delay is configured, the controller
will wait before activating the selected valve. If no valve is active, the last valve (as they appear in
the controller’s configuration) will be started. Setting next_prev_ignore_disabled to true will
cause this action to skip valves that are not enabled via their valve enable switch (see above).
on_...: then: - sprinkler.previous_valve: sprinkler_ctrlrsprinkler.pause Action
Section titled “sprinkler.pause Action”Immediately turns off all valves, saving the active valve and the amount of time remaining so that the cycle may be resumed later on.
on_...: then: - sprinkler.pause: sprinkler_ctrlrsprinkler.resume Action
Section titled “sprinkler.resume Action”Resumes a cycle placed on hold with sprinkler.pause. If there is no paused cycle, this action
will do nothing.
on_...: then: - sprinkler.resume: sprinkler_ctrlrsprinkler.resume_or_start_full_cycle Action
Section titled “sprinkler.resume_or_start_full_cycle Action”Resumes a cycle placed on hold with sprinkler.pause, but if no cycle was paused, starts a full
cycle (equivalent to sprinkler.start_full_cycle ).
on_...: then: - sprinkler.resume_or_start_full_cycle: sprinkler_ctrlrsprinkler.queue_valve Action
Section titled “sprinkler.queue_valve Action”Adds the specified valve into the controller’s queue. When the queue is enabled, valves in the queue
take precedence over valves scheduled as a part of a full cycle of the system (when auto-advance is
enabled). If run_duration is not specified or is zero, the sprinkler controller will use the
valve’s configured run duration. Valves are numbered in the order they appear in the sprinkler
controller’s configuration starting at zero (0). Note that, at present, the queue has a hard-coded
limit of 100 entries to limit memory use. Please see The Sprinkler Controller Queue
section below for more detail and examples.
on_...: then: - sprinkler.queue_valve: id: sprinkler_ctrlr valve_number: 2 run_duration: 900ssprinkler.clear_queued_valves Action
Section titled “sprinkler.clear_queued_valves Action”Removes all queued valves from the controller’s queue. Please see The Sprinkler Controller Queue section below for more detail and examples.
on_...: then: - sprinkler.clear_queued_valves: id: sprinkler_ctrlrsprinkler.set_multiplier Action
Section titled “sprinkler.set_multiplier Action”Sets the multiplier value used to proportionally increase or decrease the run duration for all valves/zones. For seasonal changes, it’s easier to use the multiplier to adjust the watering time instead of adjusting the run durations directly. Set your run duration to the time you want for ‘mild’ weather (spring/autumn) and then use the multiplier to increase (summer) or decrease (winter) the calculated run times. When a given valve is activated, this value is multiplied by the valve’s run duration (see below) to determine the valve’s actual run duration. Note that a multiplier value of zero is allowed; if the multiplier value is zero, the sprinkler controller will not start any valves. This can result in confusing/unexpected behavior if a visual indication of this condition is not available!
on_...: then: - sprinkler.set_multiplier: id: sprinkler_ctrlr multiplier: 1.5sprinkler.set_repeat Action
Section titled “sprinkler.set_repeat Action”Specifies the number of times full cycles should be repeated. Note that the total number of cycles
the controller will run is equal to the repeat value plus one. For example, with a repeat value
of 1, the initial cycle will run, then the repeat cycle will run, resulting in a total of two cycles.
on_...: then: - sprinkler.set_repeat: id: sprinkler_ctrlr repeat: 2 # would run three cyclessprinkler.set_divider Action
Section titled “sprinkler.set_divider Action”The divider value sets both the multiplier and repeat values as follows:
- The multiplier value is set to the value of 1 /
divider - The repeat value is set to
divider- 1
As an example, given a divider value of 4, the multiplier would be set to 0.25 and the repeat value would be set to 3.
This can be useful for dividing the run duration for each valve into multiple shorter cycles, therefore avoiding run-off by allowing the ground more time to absorb the water.
on_...: then: - sprinkler.set_divider: id: sprinkler_ctrlr divider: 2sprinkler.set_valve_run_duration Action
Section titled “sprinkler.set_valve_run_duration Action”Sets the run duration for the specified valve. When the valve is activated, this value is multiplied by the multiplier value (see above) to determine the valve’s actual run duration.
on_...: then: - sprinkler.set_valve_run_duration: id: sprinkler_ctrlr valve_number: 0 run_duration: 600sNOTE
-
The
start_single_valveaction ignores whether a valve is enabled via its enable switch. -
The
next_valveandprevious_valveactions may not appear to respond immediately if eithermanual_selection_delayor any of the various delay mechanisms described in the Pump and Distribution Valve Coordination section below are configured. If you are using any of these configuration options, be sure to allow the delay intervals to elapse before assuming something isn’t working! -
If a valve is active when its
run_durationor the multiplier value is changed, the active valve’s run duration will remain unaffected until the next time it is started.
Pump and Distribution Valve Coordination
Section titled “Pump and Distribution Valve Coordination”The sprinkler controller allows extensive flexibility relating to the switching of pumps and valves. Let’s take a closer look at how to use these features to tune your system.
Delayed Starting and/or Stopping of Pumps or Valves
Section titled “Delayed Starting and/or Stopping of Pumps or Valves”For systems with pumps, it’s generally a bad idea to run the pump with no distribution valves open. This causes pressure to build up and can even destroy the pump after some time. For systems with (a) pump(s), you’ll likely want to add two configuration options:
sprinkler: - id: lawn_sprinkler_ctrlr pump_start_pump_delay: 3s pump_stop_valve_delay: 3s ...This will cause any given pump to start (in this example) three seconds after any associated distribution
valve is opened. In addition, it will wait three seconds to close the last distribution valve after
the pump is stopped. This would allow the pump to spin down, pressure to drop and lines to drain prior
to switching off the (last) associated distribution valve. (In these configurations, it might also be
desirable to enable valve_overlap, as well — more on this below.)
Some types of electric valves require sufficient water pressure to (fully/quickly) close. These types of valves, when coupled with electric valves upstream of distribution valves (often known in the industry as “main” or “master” valves), may require that the upstream valve is switched on before any given distribution valve(s), allowing the water pressure to stabilize and force all distribution valves closed before any single distribution valve is opened. In these situations, the reverse of the above configuration may be desirable:
sprinkler: - id: lawn_sprinkler_ctrlr pump_start_valve_delay: 3s pump_stop_pump_delay: 3s ...In this example, the upstream valve would open three seconds prior to any given associated distribution
valve, allowing the water pressure to force any attached distribution valves closed. After the delay, the
required distribution valve is opened and the cycle starts. When the cycle is complete, the (last) distribution
valve would be switched off three seconds prior to the upstream valve. (In these configurations, it might also
be desirable to enable valve_open_delay, as well.)
NOTE
Using pump_stop_valve_delay or pump_stop_pump_delay with valve_open_delay and
pump_switch_off_during_valve_open_delay may increase the off-time inserted between the operation
of each zone, as the controller must wait for a given zone (pump and valve) to fully shut down before
it can be started again.
Banging Pipes or Valves That Don’t Consistently Close
Section titled “Banging Pipes or Valves That Don’t Consistently Close”A common complaint people have with sprinkler systems is that of banging pipes. In other, less common situations, some systems suffer from valves that do not (fully/quickly) close. There are three controller options available to address either of these complaints/concerns:
valve_overlapvalve_open_delaypump_switch_off_during_valve_open_delay
The first option, valve_overlap, causes the current valve and the next valve (as the controller is iterating
through valves) to run simultaneously for the duration specified. The idea here is that this causes a reduction
in water pressure as the next zone starts up, therefore minimizing banging pipes (aka the “water hammer” effect)
when the valve that is finishing up finally closes.
The second and third options may be used to ensure sufficient water pressure is available to force valves closed. This may be useful for pressure-sensitive valves that don’t quickly and/or fully close when water pressure is low.
For systems with pumps, it may be desirable to switch off the pump before switching to the next distribution
valve/zone. In these situations, pump_switch_off_during_valve_open_delay may prove useful in conjunction
with valve_open_delay.
In any case, the examples in the next section illustrate how/where to add these options into your configuration.
Controller Examples
Section titled “Controller Examples”Single Controller, Single Valve, No Pump
Section titled “Single Controller, Single Valve, No Pump”This first example illustrates a complete, single-valve system with no pump/upstream valve(s). It
could be useful for controlling a single valve independent of any other sprinkler controllers. A pump
could easily be added by adding the pump_switch_id parameter and a switch.
esphome:    name: esp-sprinkler-controller
esp32:    board: esp32dev
wifi:    ssid: "wifi_ssid"    password: "wifi_password"
logger:
sprinkler:  - id: garden_sprinkler_ctrlr    valves:      - valve_switch: "Flower Garden"        run_duration: 300s        valve_switch_id: garden_sprinkler_valve
switch:  - platform: gpio    id: garden_sprinkler_valve    pin: GPIOXX
Single Controller, Three Valves, No Pump
Section titled “Single Controller, Three Valves, No Pump”This example illustrates a complete, simple three-valve system with no pump/upstream valve(s):
esphome:    name: esp-sprinkler-controller
esp32:    board: esp32dev
wifi:    ssid: "wifi_ssid"    password: "wifi_password"
logger:
sprinkler:  - id: lawn_sprinkler_ctrlr    main_switch: "Lawn Sprinklers"    auto_advance_switch: "Lawn Sprinklers Auto Advance"    reverse_switch: "Lawn Sprinklers Reverse"    multiplier_number: "Lawn Sprinkler Multiplier"    repeat_number: "Lawn Sprinkler Repeat"    valve_overlap: 5s    valves:      - valve_switch: "Front Lawn"        enable_switch: "Enable Front Lawn"        run_duration_number: "Front Yard Run Duration"        valve_switch_id: lawn_sprinkler_valve_sw0      - valve_switch: "Side Lawn"        enable_switch: "Enable Side Lawn"        run_duration_number: "Front Yard Run Duration"        valve_switch_id: lawn_sprinkler_valve_sw1      - valve_switch: "Back Lawn"        enable_switch: "Enable Back Lawn"        run_duration_number: "Front Yard Run Duration"        valve_switch_id: lawn_sprinkler_valve_sw2
switch:  - platform: gpio    id: lawn_sprinkler_valve_sw0    pin: GPIOXX  - platform: gpio    id: lawn_sprinkler_valve_sw1    pin: GPIOXX  - platform: gpio    id: lawn_sprinkler_valve_sw2    pin: GPIOXX
Single Controller, Three Valves, Single Pump
Section titled “Single Controller, Three Valves, Single Pump”This example illustrates a complete three-valve system with a single pump/upstream valve:
esphome:    name: esp-sprinkler-controller
esp32:    board: esp32dev
wifi:    ssid: "wifi_ssid"    password: "wifi_password"
logger:
sprinkler:  - id: lawn_sprinkler_ctrlr    main_switch: "Lawn Sprinklers"    auto_advance_switch: "Lawn Sprinklers Auto Advance"    reverse_switch: "Lawn Sprinklers Reverse"    valve_open_delay: 5s    valves:      - valve_switch: "Front Lawn"        enable_switch: "Enable Front Lawn"        pump_switch_id: sprinkler_pump_sw        run_duration: 900s        valve_switch_id: lawn_sprinkler_valve_sw0      - valve_switch: "Side Lawn"        enable_switch: "Enable Side Lawn"        pump_switch_id: sprinkler_pump_sw        run_duration: 900s        valve_switch_id: lawn_sprinkler_valve_sw1      - valve_switch: "Back Lawn"        enable_switch: "Enable Back Lawn"        pump_switch_id: sprinkler_pump_sw        run_duration: 900s        valve_switch_id: lawn_sprinkler_valve_sw2
switch:  - platform: gpio    id: sprinkler_pump_sw    pin: GPIOXX  - platform: gpio    id: lawn_sprinkler_valve_sw0    pin: GPIOXX  - platform: gpio    id: lawn_sprinkler_valve_sw1    pin: GPIOXX  - platform: gpio    id: lawn_sprinkler_valve_sw2    pin: GPIOXX
Single Controller, Three Latching Valves, Single Latching Pump
Section titled “Single Controller, Three Latching Valves, Single Latching Pump”This example is similar to the previous example, however it illustrates how a “latching” or “pulsed” valve can be configured using H-Bridge switches. This type of valve requires two GPIO pins to operate — one to switch the valve on and another to switch the valve off.
Note that, while this example illustrates a configuration that uses exclusively latching valves, latching and non-latching valves may be mixed and matched in any configuration, even if attached to a common pump/upstream valve.
esphome:  name: esp-sprinkler-controller
esp32:  board: esp32dev
wifi:  ssid: "wifi_ssid"  password: "wifi_password"
logger:
sprinkler:  - id: lawn_sprinkler_ctrlr    main_switch: "Lawn Sprinklers"    auto_advance_switch: "Lawn Sprinklers Auto Advance"    queue_enable_switch: "Lawn Sprinklers Queue Enable"    reverse_switch: "Lawn Sprinklers Reverse"    valve_open_delay: 5s    valves:      - valve_switch: "Front Lawn"        enable_switch: "Enable Front Lawn"        pump_switch_id: sprinkler_pump_sw        run_duration: 900s        valve_switch_id: lawn_sprinkler_valve_sw0      - valve_switch: "Side Lawn"        enable_switch: "Enable Side Lawn"        pump_switch_id: sprinkler_pump_sw        run_duration: 900s        valve_switch_id: lawn_sprinkler_valve_sw1      - valve_switch: "Back Lawn"        enable_switch: "Enable Back Lawn"        pump_switch_id: sprinkler_pump_sw        run_duration: 900s        valve_switch_id: lawn_sprinkler_valve_sw2
switch:  - platform: hbridge    id: sprinkler_pump_sw    on_pin: GPIOXX    off_pin: GPIOXX    pulse_length: 250ms  - platform: hbridge    id: lawn_sprinkler_valve_sw0    on_pin: GPIOXX    off_pin: GPIOXX    pulse_length: 250ms  - platform: hbridge    id: lawn_sprinkler_valve_sw1    on_pin: GPIOXX    off_pin: GPIOXX    pulse_length: 250ms  - platform: hbridge    id: lawn_sprinkler_valve_sw2    on_pin: GPIOXX    off_pin: GPIOXX    pulse_length: 250ms
Dual Controller, Five Valves, Two Pumps
Section titled “Dual Controller, Five Valves, Two Pumps”This example illustrates a complete and more complex dual-controller system with a total of five valves (three on the first controller and two on the second controller) and two pumps/upstream valves, each of which are shared between the two controllers:
esphome:    name: esp-sprinkler-controller
esp32:    board: esp32dev
wifi:    ssid: "wifi_ssid"    password: "wifi_password"
logger:
sprinkler:  - id: lawn_sprinkler_ctrlr    main_switch: "Lawn Sprinklers"    auto_advance_switch: "Lawn Sprinklers Auto Advance"    reverse_switch: "Lawn Sprinklers Reverse"    valve_overlap: 5s    valves:      - valve_switch: "Front Lawn"        enable_switch: "Enable Front Lawn"        pump_switch_id: sprinkler_pump_sw0        run_duration: 900s        valve_switch_id: lawn_sprinkler_valve_sw0      - valve_switch: "Side Lawn"        enable_switch: "Enable Side Lawn"        pump_switch_id: sprinkler_pump_sw0        run_duration: 900s        valve_switch_id: lawn_sprinkler_valve_sw1      - valve_switch: "Back Lawn"        enable_switch: "Enable Back Lawn"        pump_switch_id: sprinkler_pump_sw1        run_duration: 900s        valve_switch_id: lawn_sprinkler_valve_sw2  - id: garden_sprinkler_ctrlr    main_switch: "Garden Sprinklers"    auto_advance_switch: "Garden Sprinklers Auto Advance"    reverse_switch: "Garden Sprinklers Reverse"    valve_open_delay: 5s    valves:      - valve_switch: "Front Garden"        enable_switch: "Enable Front Garden"        pump_switch_id: sprinkler_pump_sw0        run_duration_number:          id: garden_sprinkler_ctrlr_front_run_duration          name: "Front Garden Run Duration"          initial_value: 10          unit_of_measurement: min        valve_switch_id: garden_sprinkler_valve_sw0      - valve_switch: "Back Garden"        enable_switch: "Enable Back Garden"        pump_switch_id: sprinkler_pump_sw1        run_duration_number:          id: garden_sprinkler_ctrlr_back_run_duration          name: "Back Garden Run Duration"          initial_value: 10          unit_of_measurement: min        valve_switch_id: garden_sprinkler_valve_sw1
switch:  - platform: gpio    id: sprinkler_pump_sw0    pin: GPIOXX  - platform: gpio    id: sprinkler_pump_sw1    pin: GPIOXX  - platform: gpio    id: lawn_sprinkler_valve_sw0    pin: GPIOXX  - platform: gpio    id: lawn_sprinkler_valve_sw1    pin: GPIOXX  - platform: gpio    id: lawn_sprinkler_valve_sw2    pin: GPIOXX  - platform: gpio    id: garden_sprinkler_valve_sw0    pin: GPIOXX  - platform: gpio    id: garden_sprinkler_valve_sw1    pin: GPIOXX
NOTE
In this final complete configuration example, pump control is split among the two sprinkler controller instances. This will behave as expected; multiple instances of the controller will communicate to ensure any given pump is activated and deactivated only as necessary, even when the controllers are operating simultaneously.
Using the Sprinkler Controller’s Numbers
Section titled “Using the Sprinkler Controller’s Numbers”The sprinkler controller can leverage ESPHome’s/Home Assistant’s number component to make valve run durations easily adjustable from the front end (Home Assistant).
sprinkler: - id: lawn_sprinkler_ctrlr multiplier_number: "Lawn Sprinkler Multiplier" repeat_number: "Lawn Sprinkler Repeat" ...An added benefit of using number components is that modified valve run durations, multiplier and repeat values can persist across resets/reboots of the ESP device. If this is your desired behavior, you should configure the number components within your sprinkler controller configuration.
The sprinkler controller’s implementation of the number component is based on ESPHome’s Number, supporting all of its configuration variables in addition to a subset of the Template Number Component’s configuration variables, including:
initial_value(Defaults to 900 for valves, 1 for multiplier, 0 for repeat)max_value(Defaults to 86400 for valves, 10 for multiplier and repeat)min_value(Defaults to 1 for valves, 0 for multiplier and repeat)step(Defaults to 1 for valves and repeat, 0.1 for multiplier)restore_value(Defaults totrue; set tofalseto always restoreinitial_valueat boot)set_actionunit_of_measurement(For run durations only; defaults tosfor seconds or specifyminfor minutes)
Here’s a brief example:
sprinkler: - id: lawn_sprinkler_ctrlr main_switch: "Lawn Sprinklers" ... multiplier_number: id: controller_multiplier_number name: "Lawn Sprinkler Multiplier" initial_value: 1.5 min_value: 0.1 max_value: 5 set_action: - lambda: "some_function();" ...Extending the Sprinkler Controller’s Switches
Section titled “Extending the Sprinkler Controller’s Switches”It is worth noting that each of the various switches in the sprinkler controller’s configuration are standard ESPHome switch components. Their configuration may be extended in a manner similar to the following example:
# Extended switch configuration for 'main_switch'sprinkler: - id: sprinkler_ctrlr main_switch: name: "Lawn Sprinklers" id: sprinkler_ctrlr_main_switch_id on_turn_on: light.turn_on: my_light ...This arrangement is possible for any other switch within the sprinkler controller’s configuration block, with
the exception of pump_switch_id and valve_switch_id (because these are the IDs of other switch components already
defined elsewhere in your configuration). In addition, specifying each switch ID enables the ability to refer
to any of the sprinkler controller’s switches from elsewhere in your configuration. Here’s another brief example:
# Template switch as a secondary main switchswitch: - platform: template id: my_switch name: "My Special Sprinkler Switch" on_turn_off: - switch.turn_off: sprinkler_ctrlr_main_switch_id - light.turn_off: sprinkler_indicator_light on_turn_on: - switch.turn_on: sprinkler_ctrlr_main_switch_id - light.turn_on: sprinkler_indicator_light ...While the above example simply illustrates creating a secondary “main” switch, this approach could be extended
to take advantage of other devices such as a moisture sensor — when the moisture level
is too low (look for on_value or on_value_range ), the sprinkler controller (or a specific valve) could
be activated by calling one of the controller’s start-up actions, such as sprinkler.start_full_cycle,
sprinkler.start_from_queue, sprinkler.start_single_valve, or sprinkler.resume_or_start_full_cycle.
The Sprinkler Controller Queue
Section titled “The Sprinkler Controller Queue”The queuing mechanism is an unusual feature for a sprinkler controller; it becomes useful as a result of the extreme flexibility of both ESPHome and Home Assistant. Given the extensive ecosystem of devices available today, the sprinkler controller’s queuing mechanism provides an advanced feature aimed at allowing even more advanced automation.
In general, it comes down to flexibility: the more traditional “run full cycle” and “run single valve” functionality is intended for use by humans (via the front end or physical control interface) while the queuing mechanism is aimed at supporting automation.
Here’s a practical example:
Consider a home with a yard divided into a number of sprinkler zones — perhaps it even includes a garden or two (flowers and vegetables, of course!). An array of soil moisture sensors could be deployed throughout the various zones and gardens and when a given sensor falls below some defined threshold, that sensor’s zone is entered into the sprinkler controller’s queue.
Then, each morning at some specific hour, Home Assistant (or even the ESP device itself!) calls the sprinkler
controller’s sprinkler.start_from_queue action, causing the controller to iterate only through queued zones.
Because the run duration may be specified as a part of the queue request, this could be extended to compute a
specific run duration for each zone depending on the specific moisture level of the soil on any given day. The
possibilities are endless and are only limited by your creativity!
It is important to note that, if both the auto-advance and queue switches are turned on/enabled, queued valves take precedence over valves that would run as a part of a full cycle of the system. In other words, if the queue is enabled and a valve is entered into the queue while a full cycle is active, at the next valve transition, the queue entry will be picked up before the next valve that would run as a part of the full cycle. At present, this behavior cannot be changed. It should also be noted that the queue has a hard-coded limit of 100 entries to limit memory use.
Expose Sprinkler Controller Actions via user-API
Section titled “Expose Sprinkler Controller Actions via user-API”This configuration snippet illustrates how user-defined ESPHome API actions may be used to expose various sprinkler controller actions to the front end. This could be useful to change settings and/or trigger sprinkler controller actions using automations.
api: actions: - action: set_multiplier variables: multiplier: float then: - sprinkler.set_multiplier: id: lawn_sprinkler_ctrlr multiplier: !lambda 'return multiplier;' - action: start_full_cycle then: - sprinkler.start_full_cycle: lawn_sprinkler_ctrlr - action: start_single_valve variables: valve: int then: - sprinkler.start_single_valve: id: lawn_sprinkler_ctrlr valve_number: !lambda 'return valve;' - action: next_valve then: - sprinkler.next_valve: lawn_sprinkler_ctrlr - action: previous_valve then: - sprinkler.previous_valve: lawn_sprinkler_ctrlr - action: shutdown then: - sprinkler.shutdown: lawn_sprinkler_ctrlrUnderstanding the Sprinkler Controller’s State
Section titled “Understanding the Sprinkler Controller’s State”A number of people have asked about how to determine the sprinkler controller’s state. This section aims to outline how to use the sprinkler controller’s API Reference: API to determine what it is doing, generally with the goal of indicating this on some form of display hardware. Note that this discussion largely revolves around C++ code (as is used in ESPHome lambdas).
Many of the methods used to determine the sprinkler controller’s state return a type of value known as an optional.
If you are curious, a general reference for the optional type may be found
on cppreference.com, but what is important for now is:
-
The
optionaltype may or may not contain a value-
The method
has_value()is used to determine if a value is present. For example:id(lawn_sprinkler_ctrlr).active_valve().has_value() -
The method
value()is used to determine the value, if it is determined that a value is present. For example:auto running_valve = id(lawn_sprinkler_ctrlr).active_valve().value()
-
-
The
optionaltype can contain a value of any C++ type (bool,int,float, etc.) (In C++ terms, it is a template.)
The examples that follow illustrate use of the sprinkler controller’s methods within a display lambda. The examples are intended to illustrate a pattern and (for sake of brevity) are not complete; at very least you’ll need to fill out the display component’s specific configuration details before you can use them.
With these points in mind, let’s discuss some of the methods which indicate the state of the sprinkler controller. We’ll approach this from the angle of “how do I…”
How Do I
Section titled “How Do I”-
…determine if the sprinkler controller is running?
Use the method
optional<size_t> active_valve()to check if there is an active valve. If theoptionalreturnedhas_value(), the sprinkler controller is running and you may use thevalue()method to check which specific valve is active.Example:
display: - platform: ... # ...display configuration... lambda: |- if (id(lawn_sprinkler_ctrlr).active_valve().has_value()) { // the controller is running, get the active valve into running_valve and print it auto running_valve = id(lawn_sprinkler_ctrlr).active_valve().value(); it.printf(0, 0, "Valve %u active", running_valve); } else { // the controller is NOT running it.print(0, 0, "Idle"); }-
…determine if the sprinkler controller is paused and, if so, which valve is paused?
Use the method
optional<size_t> paused_valve()to check if there is a paused valve. If theoptionalreturnedhas_value(), the sprinkler controller is paused and you may use thevalue()method to check which specific valve is paused. In general, this follows the same pattern as the active_valve() example above. -
…determine the sprinkler controller’s current mode?
If by this you mean, “is auto-advance/the queue/reverse/standby enabled?”, you are in the right spot. Methods exist for just this purpose:
bool auto_advance()bool queue_enabled()bool reverse()bool standby()
Each will return
trueif the respective “mode” is enabled.Examples:
display: - platform: ... # ...display configuration... lambda: |- if (id(lawn_sprinkler_ctrlr).auto_advance()) { // auto-advance is enabled it.print(0, 0, "Auto-advance enabled"); } else { // auto-advance is NOT enabled it.print(0, 0, "Auto-advance disabled"); } if (id(lawn_sprinkler_ctrlr).queue_enabled()) { // queue is enabled it.print(0, 10, "Queue enabled"); } else { // queue is NOT enabled it.print(0, 10, "Queue disabled"); }-
…determine the sprinkler controller’s multiplier/repeat values?
Methods of interest in this case are:
float multiplier()optional<uint32_t> repeat()optional<uint32_t> repeat_count()
Note again that each of the
repeatmethods returns anoptionaltype; if theoptionalreturnedhas_value(), repeating is enabled and you can get the repeat target (repeat()) or current repeat count (repeat_count()) withoptional’svalue()method.The
multiplier()method returns afloattype and, as such, it always has a value.Examples:
    display:      - platform: ...        # ...display configuration...        lambda: |-          it.printf(0, 0, "Multiplier: %f", id(lawn_sprinkler_ctrlr).multiplier());
if (id(lawn_sprinkler_ctrlr).repeat().has_value()) { // the controller is repeating, print the repeat target value it.printf(0, 10, "Repeat %u times", id(lawn_sprinkler_ctrlr).repeat().value()); }-
…determine how much time is left/required?
Several methods are available for this purpose:
uint32_t total_cycle_time_all_valves()uint32_t total_cycle_time_enabled_valves()uint32_t total_cycle_time_enabled_incomplete_valves()uint32_t total_queue_time()optional<uint32_t> time_remaining_active_valve()optional<uint32_t> time_remaining_current_operation()
Note that, as with several of the earlier examples, the
time_remaining_...methods each return anoptionaltype. If theoptionalreturnedhas_value(), a valve is active/running; if it does nothas_value(), no valve is active, meaning the controller is idle.Example:
display: - platform: ... # ...display configuration... lambda: |- if (id(lawn_sprinkler_ctrlr).time_remaining_active_valve().has_value()) { // the controller is running, print the number of seconds remaining it.printf(0, 0, "Time left: %u sec.", id(lawn_sprinkler_ctrlr).time_remaining_active_valve().value()); } else { // the controller is NOT running it.print(0, 0, "Idle"); }