PID Climate
The pid climate platform allows you to regulate a value with a
PID controller.
PID controllers are good at modulating an output signal to get a sensor reading to a specified setpoint. For example, it can be used to modulate the power of a heating unit to get the temperature to a user-specified setpoint.
NOTE
PID is like cruise control in the cars: it keeps the car’s speed constant by continuously adjusting the fuel quantity, based on load measurements. Eg when the car has to go up on a hill, the system notices the load increase thus immediately gives more fuel to the engine; and when it goes down on the other side of the hill, it notices the load decrease thus reduces or cuts off fuel completely so that car speed remains as constant as possible. The calculation takes in consideration constants like car weight, wind resistance etc.
This kind of math can be used for a heating or cooling system too, and an auto-tuning algorithm can help determining such constants, which mainly describe the heat loss of the room or building. Goal is to keep the temperature as constant as possible, and smooth out oscillations otherwise produced by classic thermostats.
# Example configuration entryclimate: - platform: pid name: "PID Climate Controller" sensor: temperature_sensor default_target_temperature: 21°C heat_output: heater control_parameters: kp: 0.49460 ki: 0.00487 kd: 12.56301 output_averaging_samples: 5 # smooth the output over 5 samples derivative_averaging_samples: 5 # smooth the derivative value over 10 samples deadband_parameters: threshold_high: 0.5°C # deadband within +/-0.5°C of target_temperature threshold_low: -0.5°CConfiguration variables
Section titled “Configuration variables”-
sensor (Required, ID): The sensor that is used to measure the current temperature.
-
humidity_sensor (Optional, ID): If specified, this sensor is used to measure the current humidity. This is used for information only and does not influence temperature control.
-
default_target_temperature (Required, float): The default target temperature (setpoint) for the control algorithm. This can be dynamically set in the frontend later.
-
heat_output (Optional, ID): The ID of a float output that increases the current temperature. At least one of
heat_outputandcool_outputmust be specified. -
cool_output (Optional, ID): The ID of a float output that decreases the current temperature. At least one of
heat_outputandcool_outputmust be specified. -
control_parameters (Required): Control parameters of the PID controller.
-
kp (Required, float): The factor for the proportional term of the PID controller.
-
ki (Optional, float): The factor for the integral term of the PID controller. Defaults to
0. -
kd (Optional, float): The factor for the derivative term of the PID controller. Defaults to
0. -
min_integral (Optional, float): The minimum value of the integral term multiplied by
kito prevent windup. Defaults to-1. -
max_integral (Optional, float): The maximum value of the integral term multiplied by
kito prevent windup. Defaults to1. -
starting_integral_term (Optional, float): Set the initial output, by priming the integral term. This is useful for when your system is rebooted and you don’t want to wait for it to get back equilibrium.
-
output_averaging_samples (Optional, int): average the output over this many samples. PID controllers can be quite sensitive to small changes on the input sensor. By averaging the last X output samples, the temperature can be more stable. However, the larger the sampling window, the less responsive the PID controller. Defaults to
1which is no sampling/averaging. -
derivative_averaging_samples (Optional, int): average the derivative term over this many samples. Many controllers don’t use the derivative term because it is sensitive to slight changes in the input sensor. By taking an average of the derivative term it might become more useful for you. Most PID controllers call this derivative filtering. The derivative term is used to pre-act so don’t filter too much. Defaults to
1which is no sampling/averaging.
-
-
deadband_parameters (Optional): Enables a deadband to stabilise and minimise changes in the output when the temperature is close to the target temperature. See Deadband Setup.
-
threshold_high/threshold_low (Required, float): Specifies a high/low threshold defining the deadband around the target temperature. For instance with
default_target_temperatureof21°Cand thresholds of+/-0.5°C, the deadband will be between20.5°C - 21.5°C. The PID controller will limit output changes within the deadband. -
kp_multiplier (Optional, float): Set the
kpgain when inside the deadband. Defaults to0. -
ki_multiplier (Optional, float): Set the
kigain when inside the deadband. Defaults to0. -
kd_multiplier (Optional, float): Set the
kdgain when inside the deadband. Recommended this is set to0. Defaults to0. -
deadband_output_averaging_samples (Optional, int): Typically when inside the deadband the PID Controller has reached a state of equilibrium, so it advantageous to use a higher number of output samples like 10-30 samples. Defaults to
1which is no sampling/averaging.
-
-
All other options from Climate.
PID Controller Setup
Section titled “PID Controller Setup”To set up a PID climate controller, you need a couple of components:
-
A Sensor to read the current temperature (
sensor). -
At least one float output to drive for heating or cooling (or both). This could for example be a PWM output via Sigma Delta Output or Slow Pwm that drives a heating unit.
Please note the output must be controllable with continuous value (not only ON/OFF, but any state in between for example 50% heating power).
NOTE
The sensor should have a short update interval. The PID update frequency is tied to the update
interval of the sensor. Set a short update_interval like 5s on the sensor.
We recommend putting a filter on the sensor (see filters in Sensor) and
using output_averaging_samples to calm the PID sensor from a noisy input sensor.
Deadband Setup
Section titled “Deadband Setup”A deadband is used to prevent the PID controller from further adjusting the power once the temperature has settled within a range of the target temperature.
We do this by specifying a high/low threshold of the target temperature.
To understand the benefit, consider a heating/cooling HVAC which is constantly oscillating between heating and cooling as the thermostat records very minor changes from +0.1º to -0.1º. Clearly this is undesirable and will cause wear and tear as the HVAC oscillates. With a deadband in place the heater won’t activate until the thermostat breaches the low_threshold and the cooler won’t activate until the thermostat breaches the high_threshold.
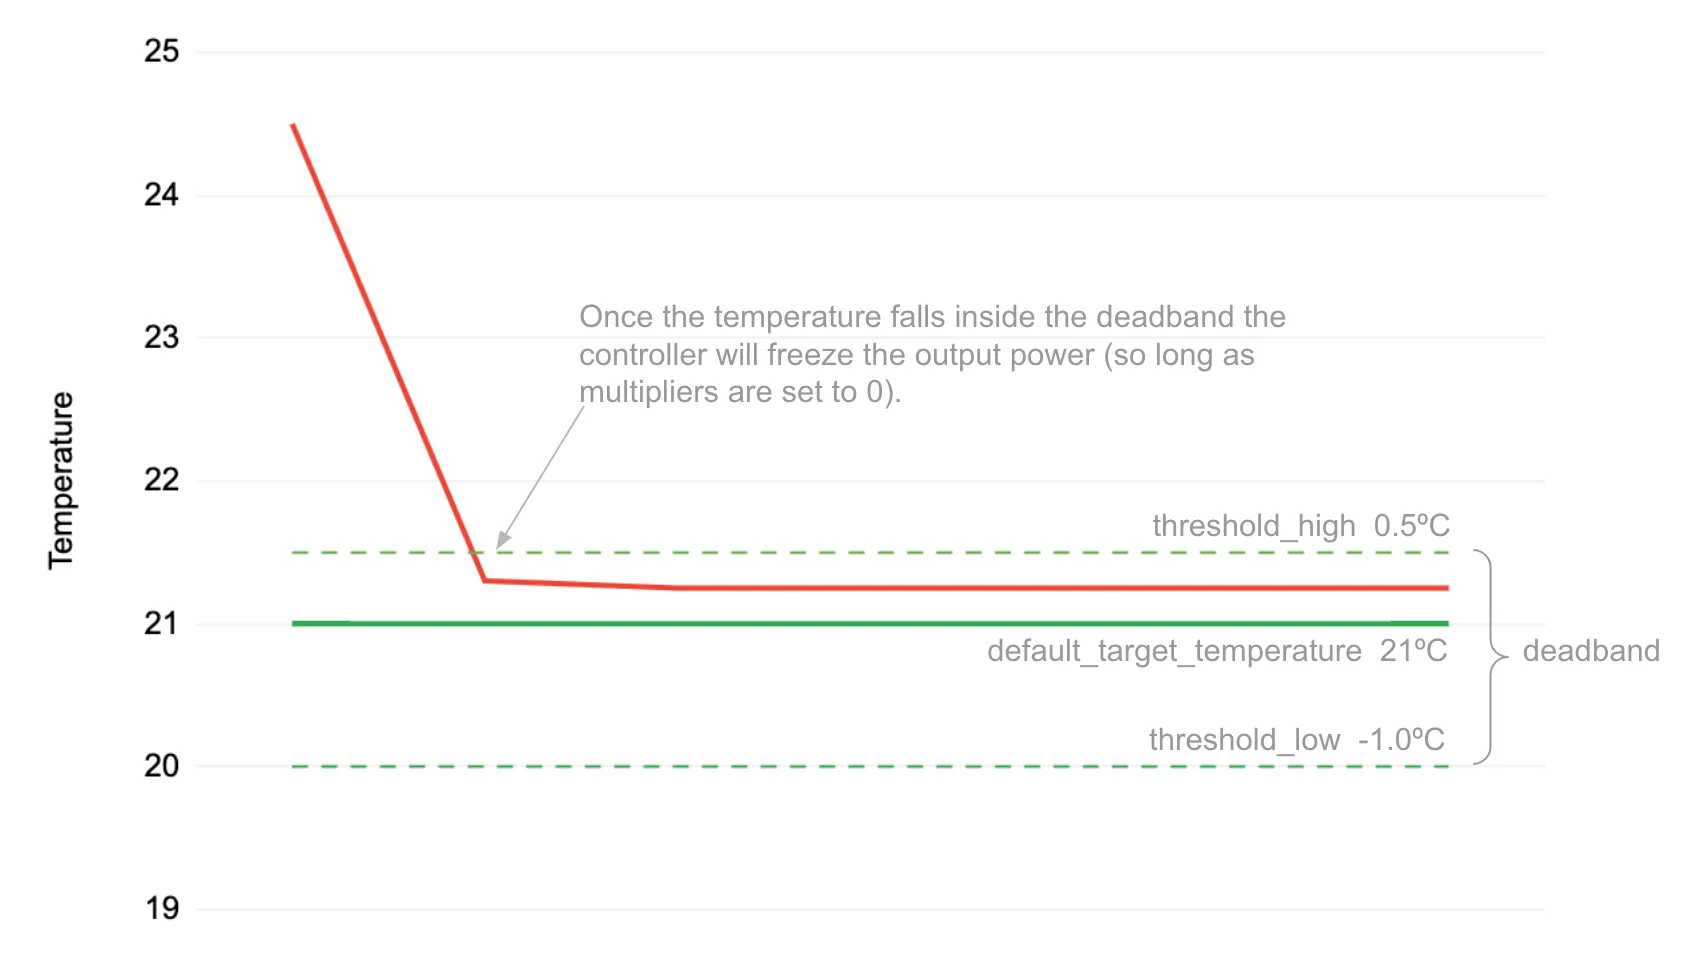
The most basic setup specifies the threshold around the target temperature as follows:
default_target_temperature: 21°C...deadband_parameters: threshold_high: 0.5°C threshold_low: -1.0°CIn this example the deadband is between 20.0°C - 21.5°C. The PID controller will limit any output
variation inside this deadband. How it limits depends on how you set the Deadband Multipliers.
Deadband Multipliers
Section titled “Deadband Multipliers”Deadband Multipliers tell the controller how to operate when inside of the deadband.
Each of the p,i and d terms can be controlled using the kp, ki and kd multipliers. For instance, if the kp_multiplier is set to 0.05 then the final proportional term will be set to 5% of its normal value within the deadband.
If all of the multipliers are set to 0, then the controller will not adjust power at all within the deadband. This is the default behavior.
Most deadband implementations set kp and ki multipliers to a small gain like 0.05 and set
derivative to 0. This means that the PID output will calmly make minor adjustments over a 20x longer
timeframe to stay within the deadband zone.
To start with we recommend just setting the ki_multiplier to 0.05 (5%). Then
set kp_multiplier to 0.05 (5%) if the controller is falling out of the deadband too often.
default_target_temperature: 21°C...deadband_parameters: threshold_high: 0.5°C threshold_low: -1.0°C kp_multiplier: 0.0 # proportional gain turned off inside deadband ki_multiplier: 0.05 # integral accumulates at only 5% of normal ki kd_multiplier: 0.0 # derviative is turned off inside deadband deadband_output_averaging_samples: 15 # average the output over 15 samples within the deadband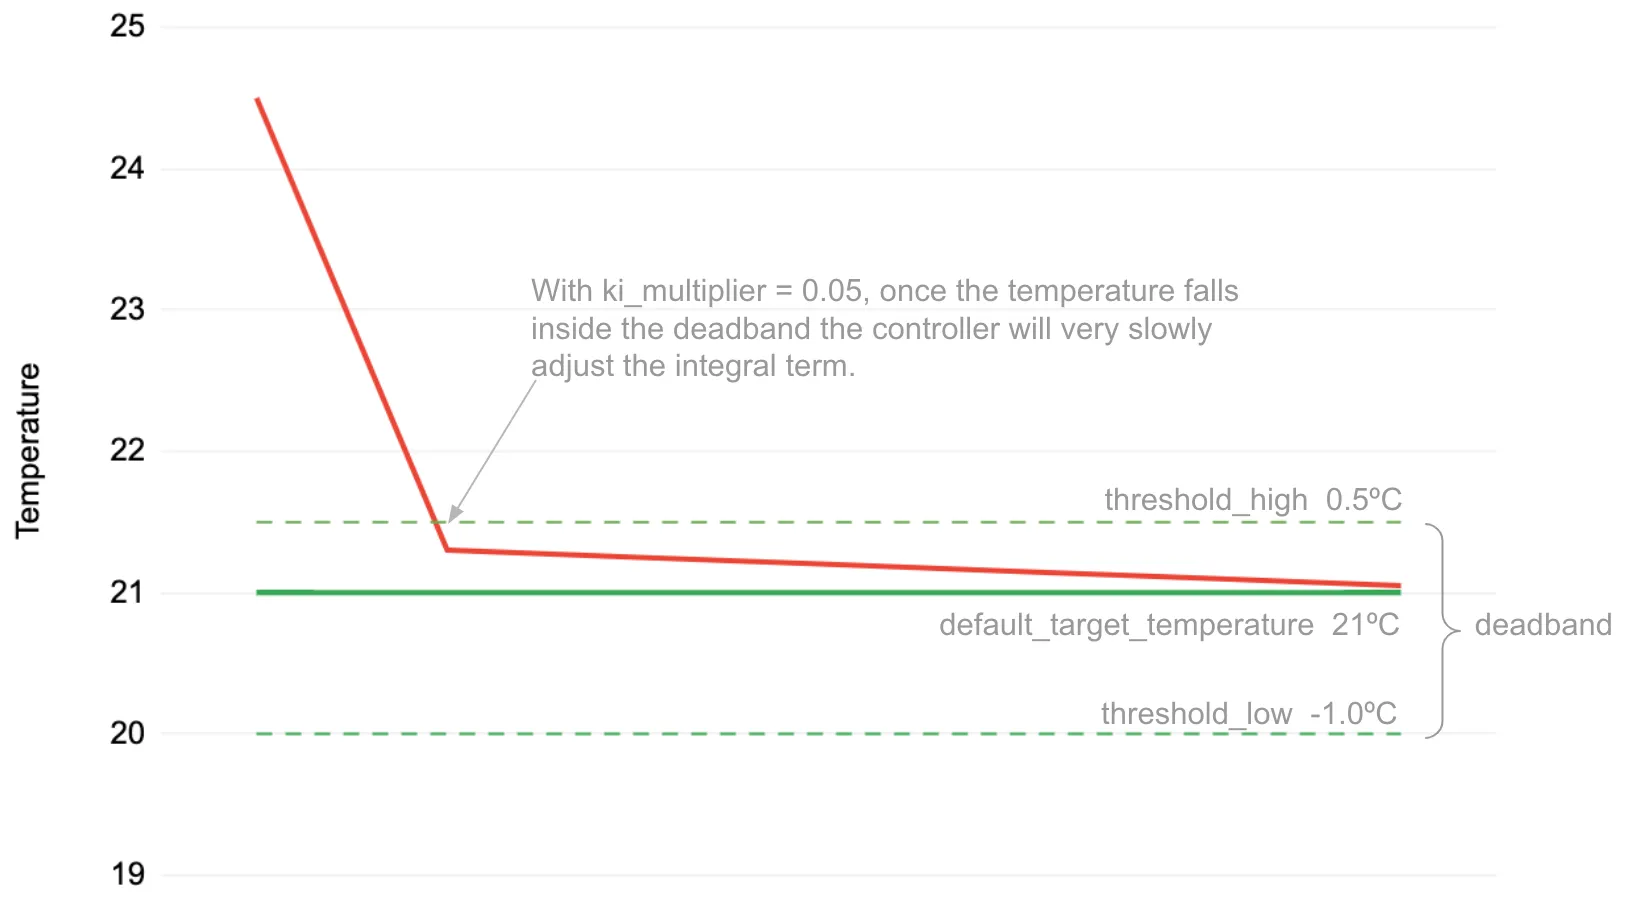
Deadband Output Averaging Samples
Section titled “Deadband Output Averaging Samples”Since we expect the PID Controller to be at equilibrium while inside the deadband, we can average the output over a longer range of samples, like 15 samples. This helps even further with temperature and controller stability.
Autotuning
Section titled “Autotuning”Finding suitable kp, ki and kd control parameters for the PID controller manually
needs some experience with PID controllers. ESPHome has an auto-tuning algorithm that automatically
finds suitable PID parameters to start using an adaption of the Ziegler-Nichols method with
relay autotuning (Åström and Hägglund).
To autotune the control parameters:
-
Set up the PID controller with all control parameters set to zero:
climate:- platform: pidid: pid_climatename: "PID Climate Controller"sensor: temperature_sensordefault_target_temperature: 21°Cheat_output: heatercontrol_parameters:kp: 0.0ki: 0.0kd: 0.0 -
Create a template button to start autotuning later:
button:- platform: templatename: "PID Climate Autotune"on_press:- climate.pid.autotune: pid_climate -
Compile & Upload the new firmware.
Now you should have a climate entity called PID Climate Controller and a button called PID Climate Autotune visible in your frontend of choice.
The autotune algorithm works by repeatedly switching the heat/cool output to full power and off. This induces an oscillation of the observed temperature and the measured period and amplitude is automatically calculated. To do this, it needs to observe at least 3 oscillation cycles.
NOTE
You have to set the setpoint of the climate controller to a value the device can reach. For example if the temperature of a room is to be controlled, the setpoint needs to be above the ambient temperature. If the ambient temperature is 20°C, the setpoint of the climate device should be set to at least ~24°C so that an oscillation can be induced.
Also take care of external influences, like for example when room temperature is severely affected by outdoor weather like sun, if it starts to warm up the room in parallel with the heating autotune will likely fail or give false results.
-
Set an appropriate setpoint (see note above) and turn on the climate controller (Heat, Cool or Auto).
-
Click the PID Climate Autotune button and look at the logs of the device.
You should see output like
PID Autotune:Autotune is still running!Status: Trying to reach 24.25 °CStats so far:Phases: 4Detected 5 zero-crossings# ...NOTE
In the output above, the autotuner is driving the heating output at 100% and trying to reach 24.25 °C.
This will continue for some time until data for 3 phases (6 crossings of the setpoint; or a bit more, depending on the data quality) have been acquired.
The autotune algorithm may take a long time to complete, it depends on the time needed to reproduce the heating up and cooling down oscillations the required number of times.
-
When the PID autotuner has succeeded, output like the one below can be seen:
PID Autotune:State: Succeeded!All checks passed!Calculated PID parameters ("Ziegler-Nichols PID" rule):control_parameters:kp: 0.49460ki: 0.00487kd: 12.56301Please copy these values into your YAML configuration! They will reset on the next reboot.As soon as the autotune procedure finishes, the climate starts to work with the calculated parameters so that expected operation can be immediately verified.
If satisfied, copy the values in
control_parametersinto your configuration:climate:- platform: pid# ...control_parameters:kp: 0.49460ki: 0.00487kd: 12.56301The PID Climate Autotune button can be removed from the config, if the results are satisfactory, it’s not needed anymore.
-
Complete, compile & upload the updated firmware.
If the calculated PID parameters are not good, you can try some of the alternative parameters printed below the main control parameters in the log output.
climate.pid.autotune Action
Section titled “climate.pid.autotune Action”This action starts the autotune process of the PID controller.
on_...:  # Basic  - climate.pid.autotune: pid_climate
  # Advanced  - climate.pid.autotune:      id: pid_climate      noiseband: 0.25      positive_output: 25%      negative_output: -25%
Configuration variables:
-
id (Required, ID): ID of the PID Climate to start autotuning for.
-
noiseband (Optional, float): The noiseband of the process (=sensor) variable. The value of the PID controller must be able to reach this value. Defaults to
0.25. -
positive_output (Optional, float): The positive output power to drive the heat output at. Defaults to
1.0. -
negative_output (Optional, float): The negative output power to drive the cool output at. Defaults to
-1.0.
The positive_output and negative_output parameters can be used to compensate the heating or the
cooling process during the autotune, in the cases when they are not changing the temperature at the
same rate, resulting in a not symmetrical oscillation. The autotune result will print a message when
it’s recommended to repeat the entire procedure with such parameters configured.
climate.pid.set_control_parameters Action
Section titled “climate.pid.set_control_parameters Action”This action sets new values for the control parameters of the PID controller. This can be used to manually tune the PID controller. Make sure to take update the values you want on the YAML file! They will reset on the next reboot.
on_...: - climate.pid.set_control_parameters: id: pid_climate kp: 0.0 ki: 0.0 kd: 0.0Configuration variables:
-
id (Required, ID): ID of the PID Climate to start autotuning for.
-
kp (Required, float, templatable): The factor for the proportional term of the PID controller.
-
ki (Optional, float, templatable): The factor for the integral term of the PID controller. Defaults to
0. -
kd (Optional, float, templatable): The factor for the derivative term of the PID controller. Defaults to
0.
climate.pid.reset_integral_term Action
Section titled “climate.pid.reset_integral_term Action”This action resets the integral term of the PID controller to 0. This might be necessary under certain conditions to avoid the control loop to overshoot (or undershoot) a target.
on_...: # Basic - climate.pid.reset_integral_term: pid_climateConfiguration variables:
- id (Required, ID): ID of the PID Climate being reset.
pid Sensor
Section titled “pid Sensor”Additionally, the PID climate platform provides an optional sensor platform to monitor the calculated PID parameters to help finding good PID values.
sensor: - platform: pid name: "PID Climate Result" type: RESULTConfiguration variables:
-
type (Required, string): The value to monitor. One of
RESULT- The resulting value (sum of P, I, and D terms).ERROR- The calculated error (setpoint - process_variable)PROPORTIONAL- The proportional term of the PID controller.INTEGRAL- The integral term of the PID controller.DERIVATIVE- The derivative term of the PID controller.HEAT- The resulting heating power to the supplied to theheat_output.COOL- The resulting cooling power to the supplied to thecool_output.KP- The current factor for the proportional term of the PID controller.KI- The current factor for the integral term of the PID controller.KD- The current factor for the differential term of the PID controller.
-
All other options from Sensor.
Advanced options:
- climate_id (Optional, ID): The ID of the pid climate to get the values from.
See Also
Section titled “See Also”-
Ziegler-Nichols Method: Nichols, N. B. and J. G. Ziegler (1942), ‘Optimum settings for automatic controllers’, Transactions of the ASME, 64, 759-768
-
Åström, K. J. and T. Hägglund (1984a), ‘Automatic tuning of simple regulators’, Proceedings of IFAC 9th World Congress, Budapest, 1867-1872
- API Reference: pid_climate.h
- API Reference: PID Autotuner