Rotary Encoder Sensor
The rotary_encoder sensor platform allows you to use any continuous-rotation
rotary encoders with ESPHome. These devices usually have two pins with which
they encode the rotation. Every time the knob of the rotary encoder is turned, the
signals of the two pins go HIGH and LOW in turn. See
this Arduino article to gain
a better understanding of these sensors.
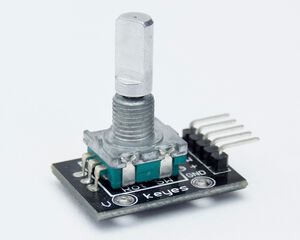
+ is connected to 3.3V, GND is connected to GND, and CLK & DT are A & B.
To use rotary encoders in ESPHome, first identify the two pins encoding the step value.
These are often called CLK and DT as in above image. Note if the values this sensor
outputs go in the wrong direction, you can just swap these two pins.
# Example configuration entrysensor: - platform: rotary_encoder name: "Rotary Encoder" pin_a: D1 pin_b: D2To modify additional parameters of pins like active state or pull-ups, you may add extra options.
# Example of advanced pin configurationpin_a: number: D5 inverted: true mode: input: true pullup: trueConfiguration variables
Section titled “Configuration variables”-
pin_a (Required, Pin Schema): The first pin for determining the step value. Must not be a pin from an external I/O expander.
-
pin_b (Required, Pin Schema): The second pin for determining the step value. Must not be a pin from an external I/O expander.
-
pin_reset (Optional, Pin Schema): An optional pin that resets the step value. This is useful with rotary encoders that have a third pin. Defaults to no reset pin.
-
resolution (Optional, string): The resolution of the sensor, this controls how many pulses are generated by one step:
1- (Default)24
-
min_value (Optional, int): The minimum value this rotary encoder will go to, turning the knob further will not decrease the number. Defaults to no minimum.
-
max_value (Optional, int): The maximum value this rotary encoder will go to, turning the knob further will not increase the number. Defaults to no maximum.
-
publish_initial_value (Optional, boolean): Controls whether the value is published upon start of ESPHome. By default, the value is only published when it changes, causing an “unknown” value at first. If you set this option to true, the value is published once after boot and when it changes. Defaults to
false. -
restore_mode (Optional): Control how the Rotary Encoder attempts to restore state on bootup.
RESTORE_DEFAULT_ZERO- (Default) Attempt to restore state and default to zero (0) if not possible to restore.ALWAYS_ZERO- Always initialize the counter with value zero (0).
-
on_clockwise (Optional, Automation): Actions to be performed when the knob is turned clockwise. See
on_clockwiseandon_anticlockwiseTriggers. -
on_anticlockwise (Optional, Automation): Actions to be performed when the knob is turned anticlockwise. See
on_clockwiseandon_anticlockwiseTriggers. -
All other options from Sensor.
sensor.rotary_encoder.set_value Action
Section titled “sensor.rotary_encoder.set_value Action”The internal state of the rotary encoder can be manually changed to any value with this action. After executing this action, rotating the encoder further will increase/decrease the state relative to the newly set internal value.
# Example configuration entrysensor:  - platform: rotary_encoder    id: my_rotary_encoder    # ...
# in some triggeron_...:  - sensor.rotary_encoder.set_value:      id: my_rotary_encoder      value: 10
  # Templated  - sensor.rotary_encoder.set_value:      id: my_rotary_encoder      value: !lambda 'return -1;'
Configuration options:
- id (Required, ID): The ID of the rotary encoder.
- value (Required, int, templatable): The value to set the internal counter to.
on_clockwise and on_anticlockwise Triggers
Section titled “on_clockwise and on_anticlockwise Triggers”With these configuration options, you can run automations based on the direction that the encoder has been turned, and not the value that it currently holds. These triggers ignore the min and max values and will trigger on every step.
on_clockwise: - logger.log: "Turned Clockwise"on_anticlockwise: - logger.log: "Turned Anticlockwise"