ST7789V TFT LCD
The st7789v display platform allows you to use
ST7789V (datasheet,
Tindie)
displays with ESPHome. Note that this component utilizes the 4-Wire SPI bus.
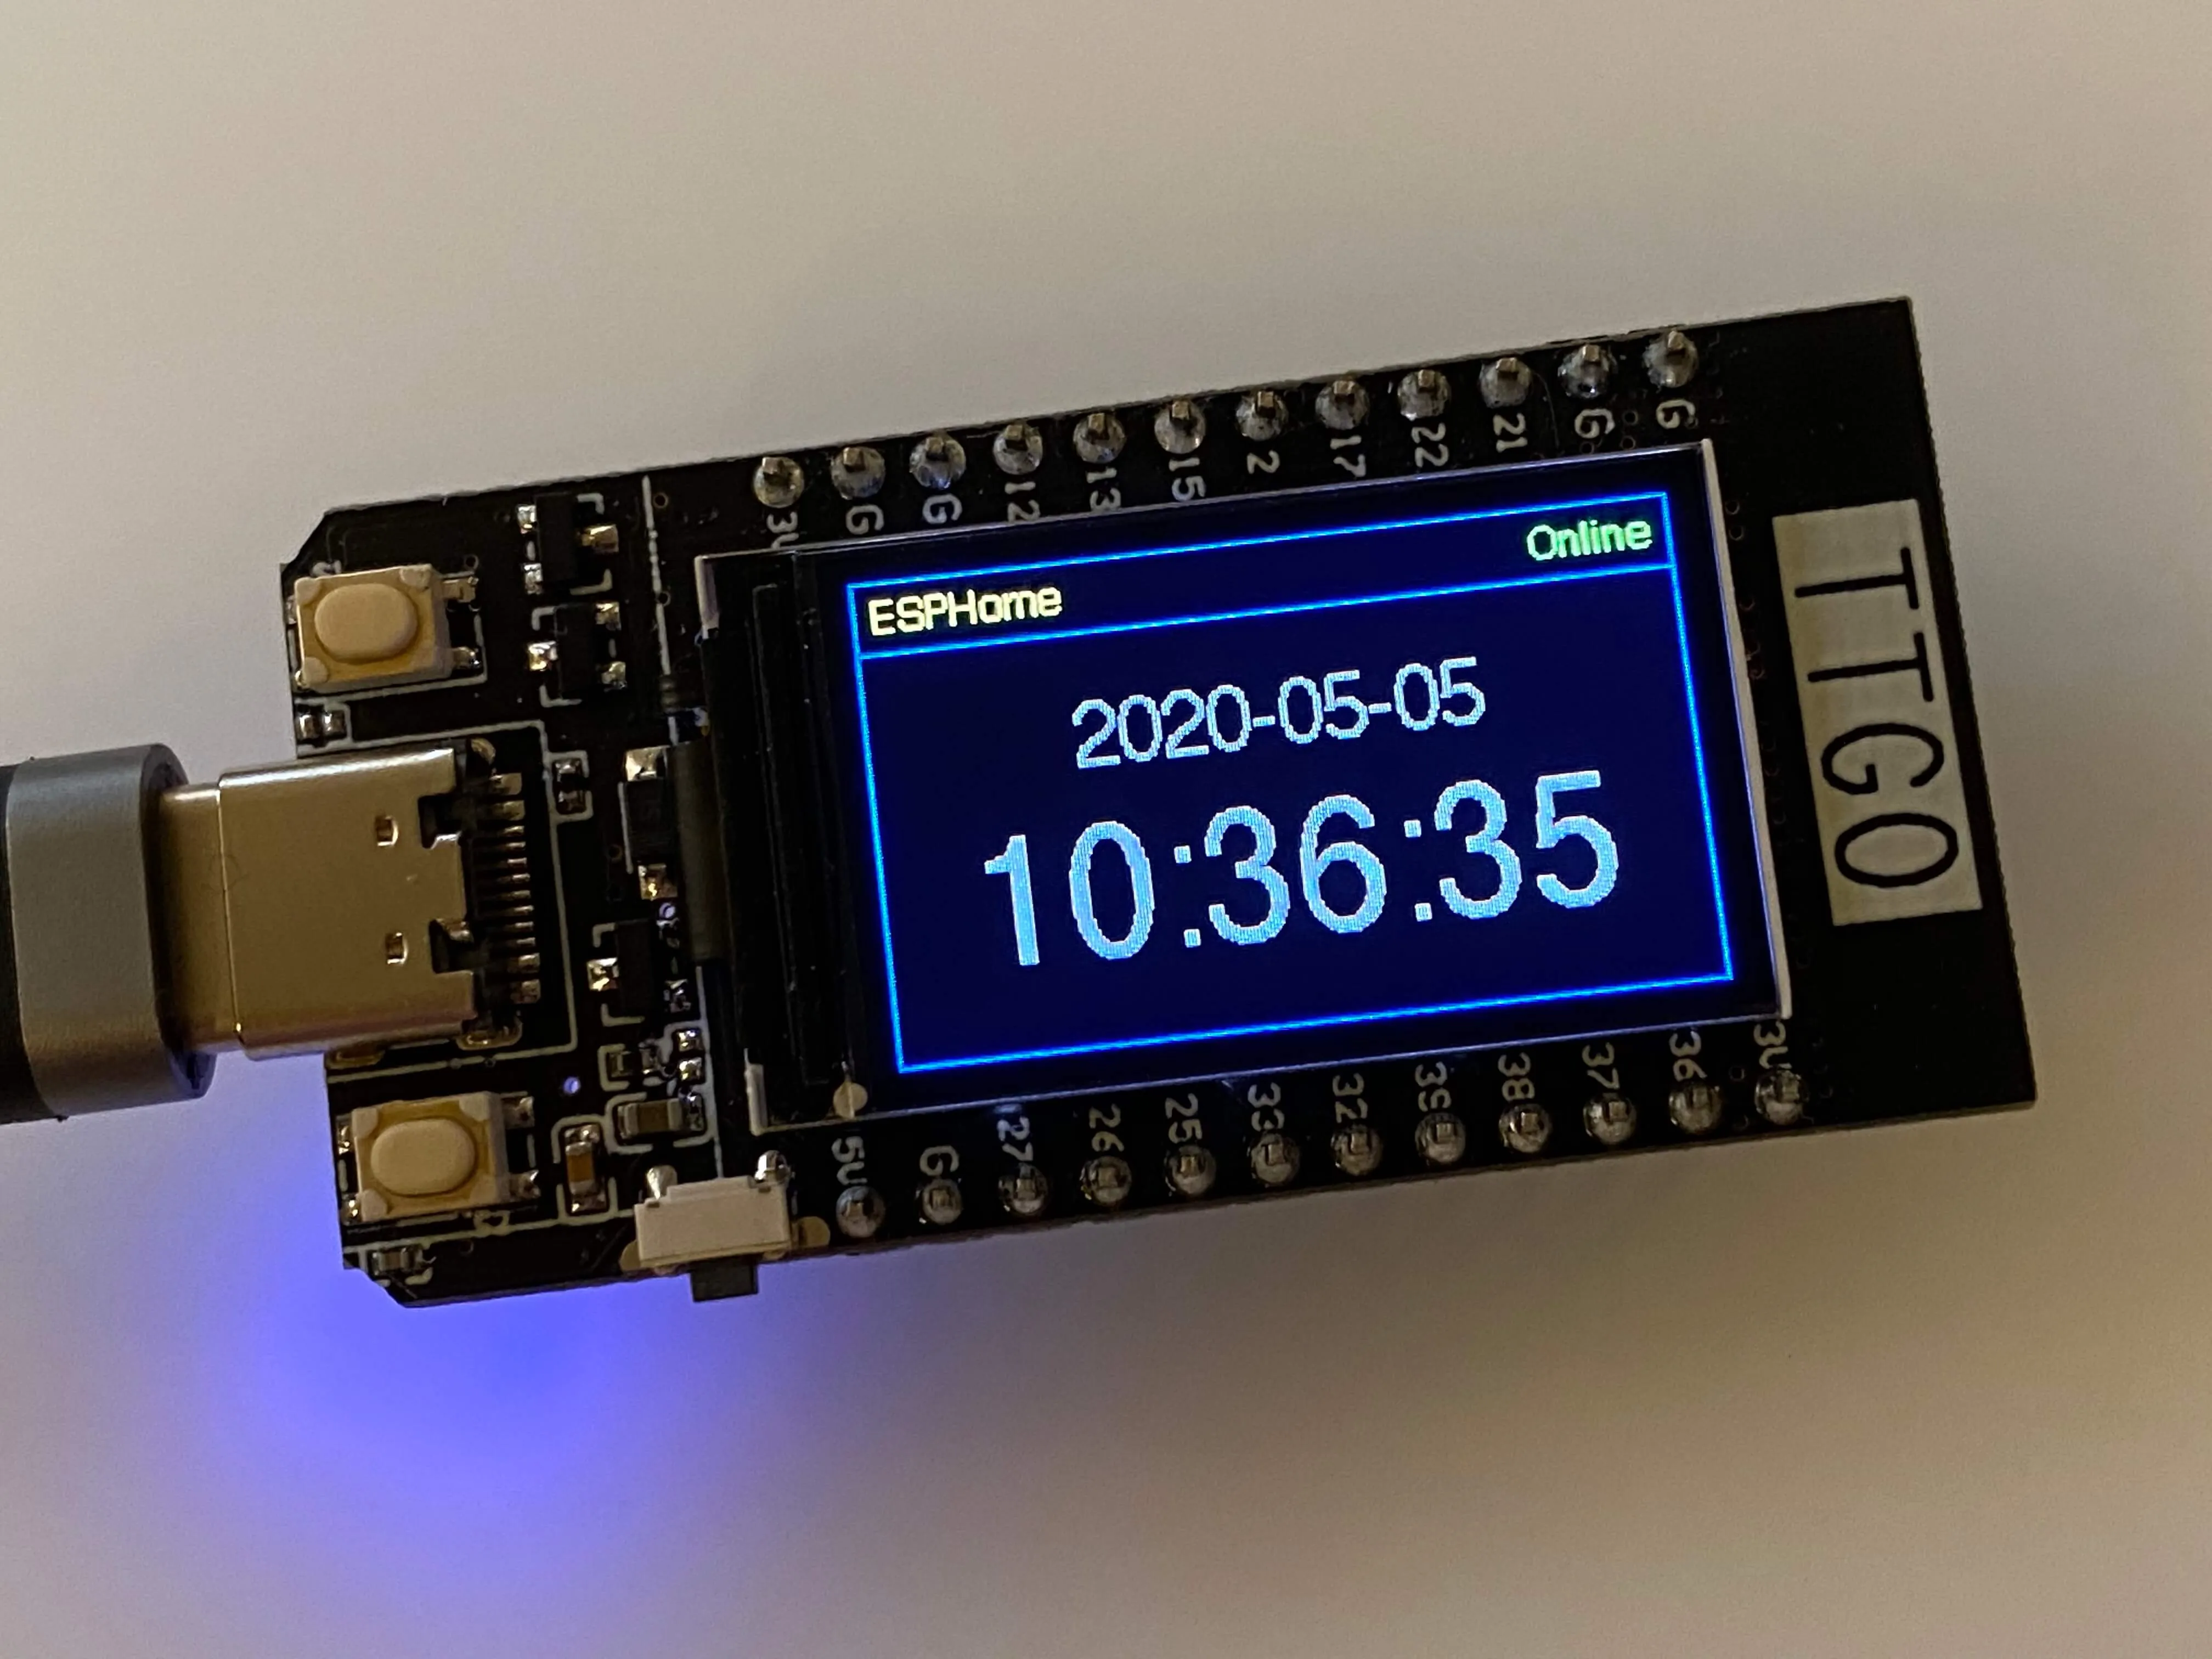
The TTGO T-Display module shown has the display attached to the module’s board and its connections to the ESP32 cannot be changed. Other display modules have pin headers or other connectors which must be connected appropriately to an ESP module.
WARNING
This component has been made redundant since the ST7789V is now supported by the MIPI SPI Display Driver. This component will be removed in a future release.
NOTE
Displays larger than the 135x240 pixel display on the TTGO T-Display shown require a significant amount of RAM to operate correctly. Some ESP devices, such as the ESP8266, do not have sufficient memory to support this display. If you attempt to use this component and experience repeated crashes, this is likely the cause of the issue. The MIPI SPI Display Driver component has features that can be used to address this issue.
# Example minimal configuration entrydisplay:  - platform: st7789v    model: TTGO TDisplay 135x240    backlight_pin: GPIOXX    cs_pin: GPIOXX    dc_pin: GPIOXX    reset_pin: GPIOXX    lambda: |-      it.print(0, 0, id(font), "Hello World!");
font:  - file: "gfonts://Roboto"    id: font    size: 20
NOTE
For more information about the font options see: Font Renderer Component.
Configuration variables
Section titled “Configuration variables”Options below marked Required might have default values set for some models and do not need to be set. If you do specify them they will override any default.
-
model (Required, string): The display model to use. One of the following options:
TTGO TDisplay 135x240Adafruit Funhouse 240x240Adafruit RR 280x240(round-rectangular display — some pixels are “deleted” from corners to form rounded shape)Adafruit S2 TFT FEATHER 240X135LILYGO T-Embed 170X320Waveshare 1.47in 172X320(round-rectangular display — some pixels are “deleted” from corners to form rounded shape)CustomFor other displays not listed above
-
height (Optional, int): Sets height of display in pixels. Default depends on
model. -
width (Optional, int): Sets width of display. Default depends on
model. -
offset_height (Optional, int): When
modelis set to “Custom”, use this to specify the display’s vertical offset in pixels. This option may not be specified when themodelis not set to “Custom”. Default depends onmodel. -
offset_width (Optional, int): When
modelis set to “Custom”, use this to specify the display’s horizontal offset in pixels. This option may not be specified when themodelis not set to “Custom”. Default depends onmodel. -
cs_pin (Optional, Pin Schema): The CS pin. Default depends on
model. -
dc_pin (Optional, Pin Schema): The DC pin. Default depends on
model. -
reset_pin (Optional, Pin Schema): The RESET pin. Default depends on
model. -
eightbitcolor (Optional, boolean): Limits the supported color depth to eight bits. May be useful on memory-constrained devices. Defaults to
false. -
backlight_pin (Optional, Pin Schema): The display’s backlight pin. May be required depending on the hardware configuration. To disable a preset backlight pin (e.g. if controlled by another component) set this to
no. -
power_supply (Optional, ID): The power supply to connect to this display if required by hardware. The power supply will be turned on before attempting to initialize the display.
-
lambda (Optional, lambda): The lambda to use for rendering the content on the display. See Display Rendering Engine for more information.
-
update_interval (Optional, Time): The interval to re-draw the screen. Defaults to
5s. -
pages (Optional, list): Show pages instead of a single lambda. See Display Pages.
-
id (Optional, ID): Manually specify the ID used for code generation.
-
data_rate (Optional, frequency): The SPI data rate (default 20MHz.) Can be reduced if required, e.g. to compensate for long data cables.
-
spi_mode (Optional, 0-3): The SPI clock mode to use (default:
mode0.) The ST7789V datasheet specifies mode 0, but some displays appear to require mode 3. This should be one ofmode0,mode1,mode2ormode3(or just a digit from 0-3.)
Preset configuration
Section titled “Preset configuration”For specific models there is some preset configuration which will satisy some of the Required unless preset values.
All models except Custom preset the height, width and offset_... values.
The table below summarises the other presets. Note that SPI CLK and SDO (mosi) pins, and the power supply pin must be separately
configured in spi: and power_supply: blocks - the pins are noted below for convenience only.
Items marked RQ are hardware dependent but required and not preset. Items marked ? are optional depending on the hardware.
Model presets
Section titled “Model presets”| Model | Height/ width | Offsets | CS | DC | Reset | Back light | Pwr sup | SPI clk | SPI mosi |
|---|---|---|---|---|---|---|---|---|---|
| TTGO TDisplay 135x240 | 240/135 | 52/40 | 5 | 6 | 23 | 4 | 18 | 19 | |
| Adafruit Funhouse 240x240 | 240/240 | 0/0 | 40 | 39 | 41 | 21 | 36 | 35 | |
| Adafruit RR 280x240 | 240/240 | 0/20 | RQ | RQ | RQ | ? | ? | RQ | RQ |
| Adafruit S2 TFT FEATHER 240X135 | 240/135 | 52/40 | 7 | 39 | 40 | 45 | 21 | 36 | 35 |
| LILYGO T-Embed 170X320 | 320/170 | 35/0 | 10 | 13 | 9 | 15 | 46 | 12 | 11 |
| Waveshare 1.47in 172X320 | 320/172 | 34/0 | 21 | 22 | 23 | 4 | 18 | 19 | |
| Custom | RQ | RQ | RQ | RQ | RQ | ? | ? | RQ | RQ |
For all boards you can override the presets by specifying any of the configuration options. Pin assignments on some boards can change between versions so if it doesn’t work with the presets check the board pinouts and override options as required.
NOTE
On memory-constrained devices, it may be possible to use part of the display area by
specifying a smaller height and/or width than that of the actual display.
Configuration examples
Section titled “Configuration examples”To use colors in your lambda:
color:  - id: my_red    red: 100%    green: 3%    blue: 5%
...
display:    ...    lambda: |-      it.rectangle(0,  0, it.get_width(), it.get_height(), id(my_red));
To bring in color images:
image:  - platform: file    file: "image.jpg"    id: my_image    resize: 200x200    type: RGB
...
display:    ...    lambda: |-      it.image(0, 0, id(my_image));
Complete example
Section titled “Complete example”The following is an example YAML configuration that you can add to your base device configuration. It defines:
-
three fonts (well, one font in three sizes)
-
a
binary_sensorthat indicates the state of connectivity to the API -
a
binary_sensorfor each of the two buttons on the TTGO module -
a
switch, allowing control of the backlight from HA -
several colors
-
a color image to be shown on the display
-
time, for display…on the display
-
the SPI configuration for communicating with the display
-
the display component itself, for use on the TTGO module
-
a lambda which paints the screen as shown in the picture above:
- blue borders, with a sort of “title bar” along the top
- “ESPHome” in yellow in the top left corner
- the API connection status, “Online” in green when connected, “Offline” in red when not
- the time and date, more or less in the center of the display
To use this example, you need only to provide the font file, “Helvetica.ttf” (or update it to a font of your choosing) and an image file, “image.png” (it may also be a “.jpg”). Place these into the same directory as the YAML configuration file itself. Comment/Uncomment/Modify the appropriate lines of C code in the lambda to hide or show the image or text as you wish.
color:  - id: my_red    red: 100%    green: 0%    blue: 0%  - id: my_yellow    red: 100%    green: 100%    blue: 0%  - id: my_green    red: 0%    green: 100%    blue: 0%  - id: my_blue    red: 0%    green: 0%    blue: 100%  - id: my_gray    red: 50%    green: 50%    blue: 50%
font:  - file: "Helvetica.ttf"    id: helvetica_48    size: 48  - file: "Helvetica.ttf"    id: helvetica_24    size: 24  - file: "Helvetica.ttf"    id: helvetica_12    size: 12
binary_sensor:  - platform: status    name: "Node Status"    id: system_status  - platform: gpio    pin:      number: GPIO0      inverted: true      mode:        input: true        pullup: true    name: "T-Display Button Input 0"    id: tdisplay_button_input_0  - platform: gpio    pin:      number: GPIO35      inverted: true    name: "T-Display Button Input 1"    id: tdisplay_button_input_1
# Allow dimmable control of the backlight (pin GPIO4)output:  - platform: ledc    pin: GPIO4    id: gpio4
light:  - platform: monochromatic    output: gpio4    name: "Backlight"
image:  - platform: file    file: "image.png"    id: my_image    resize: 200x200    type: RGB
time:  - platform: homeassistant    id: esptime
spi:  clk_pin: GPIO18  mosi_pin: GPIO19
display:  - platform: st7789v    cs_pin: GPIO5    dc_pin: GPIO16    reset_pin: GPIO23    rotation: 270    lambda: |-      it.rectangle(0,  0, it.get_width(), it.get_height(), id(my_blue));      it.rectangle(0, 20, it.get_width(), it.get_height(), id(my_blue));   // header bar
      it.strftime((240 / 2), (140 / 3) * 1 + 5, id(helvetica_24), id(my_gray), TextAlign::CENTER, "%Y-%m-%d", id(esptime).now());      it.strftime((240 / 2), (140 / 3) * 2 + 5, id(helvetica_48), id(my_gray), TextAlign::CENTER, "%H:%M:%S", id(esptime).now());      it.print(5, 5, id(helvetica_12), id(my_yellow), TextAlign::TOP_LEFT, "ESPHome");
      // Comment out the above lines to see the image without text overlaid      // it.image(0, 0, id(my_image));
      if (id(system_status).state) {        it.print(235, 5, id(helvetica_12), id(my_green), TextAlign::TOP_RIGHT, "Online");      }      else {        it.print(235, 5, id(helvetica_12), id(my_red), TextAlign::TOP_RIGHT, "Offline");      }