MAX7219 Digit Display
The max7219 display platform allows you to use MAX7219 digit with ESPHome. Please note that this component
is only for the digit “matrix” display, for the 7 segment display see Max7219.
As the communication with the MAX7219 Digit is done using SPI for this component, you need
to have an SPI bus in your configuration with both the mosi_pin set (miso_pin is not required).
Connect VCC to 3.3V (the manufacturer recommends 4+ V, but 3.3V seems to work fine), DIN to your mosi_pin and
CS to your set cs_pin and finally GND to GND.
You can even daisy-chain multiple MAX7219s by connecting the DOUT of the previous chip in the chain to the next DIN. With more than ~3 chips the 3.3V will probably not be enough, so then you will have to potentially use a logic level converter.
# Example configuration entryspi:  clk_pin: D0  mosi_pin: D1
display:  - platform: max7219digit    cs_pin: D2    num_chips: 4    intensity: 15    lambda: |-      it.print(0, 0, id(digit_font), "HELLO!");
Configuration variables
Section titled “Configuration variables”-
cs_pin (Required, Pin Schema): The pin you have the CS line hooked up to.
-
num_chips (Optional, int): The number of chips you wish to use for daisy chaining. Defaults to
4. -
rotate_chip (Optional): Rotates every 8x8 chip. Valid values are
0,90,180and270. Defaults to0. -
scroll_enable (Optional, boolean): Turn scroll mode on when content does not fit. Defaults to
true. -
scroll_mode (Optional): Set the scroll mode. One of
CONTINUOUSorSTOP. Defaults toCONTINUOUS-
CONTINUOUS: Always scrolls and the text repeats continuously, you might need to add someseparation at the end.
-
STOP: When text is over it waits thescroll_dwelltime and scroll is set back to the start.
-
-
scroll_speed (Optional, Time): Set scroll speed. Defaults to
250ms -
scroll_delay (Optional, Time): Set delay time before scroll starts. Defaults to
1s. -
scroll_dwell (Optional, Time): Sets the wait time at the end of the scroll before starting over. This is only used in mode
STOP. Defaults to1s. -
reverse_enable (Optional, boolean): For some displays the order of the displays is reversed (“DCBA”). This option will reverse the display to (“ABCD”) again. Defaults to
false. -
intensity (Optional, int): The intensity with which the MAX7219 should drive the outputs. Range is from
0, least intense to15the brightest. Defaults to15. -
lambda (Optional, lambda): The lambda to use for rendering the content on the MAX7219. See Rendering Lambda for more information.
-
update_interval (Optional, Time): The interval to re-draw the screen. Defaults to
1s. -
spi_id (Optional, ID): Manually specify the ID of the SPI Component if you want to use multiple SPI buses.
-
id (Optional, ID): Manually specify the ID used for code generation.
-
num_chip_lines (Optional, int): Number of lines if you want to use the displays in Multiline Mode. Defaults to
1Example: https://github.com/esphome/esphome/pull/1622#issue-836179156 -
chip_lines_style (Optional): How are the lines in Multiline Mode connected? Possible values are
zigzagandsnake. Defaults tosnake -
flip_x (Optional, boolean): Flip the horizontal axis on the screen. Defaults to
false.
Actions
Section titled “Actions”The following actions are replicas of the LAMBDA functions shown in the next section.
max7219digit.invert_on / max7219digit.invert_off Action
Section titled “max7219digit.invert_on / max7219digit.invert_off Action”This action max7219digit.invert_on will invert the display. So background pixels are on and text pixels are
off. max7219digit.invert_off sets the display back to normal. The background pixels are only set at the next update, the pixels drawn in
the various functions like print, line, etc. are directly influenced by the invert command.
max7219digit.turn_on / max7219digit.turn_off Action
Section titled “max7219digit.turn_on / max7219digit.turn_off Action”The display can be switched on and off “dynamically” with the actions max7219digit.turn_on / max7219digit.turn_off.
max7219digit.reverse_on / max7219digit.reverse_off Action
Section titled “max7219digit.reverse_on / max7219digit.reverse_off Action”With these actions you can reverse the display direction from left-to-right to right-to-left.
max7219digit.intensity Action
Section titled “max7219digit.intensity Action”The intensity of the screen can be set “dynamically” with this action.
- intensity (Optional, int): The intensity with which the MAX7219 should drive the outputs. Range is
from
0, least intense to15the brightest. Defaults to15.
Rendering Lambda
Section titled “Rendering Lambda”The MAX7219 digit is based on the fully fledged Display Rendering Engine, as it has a concept of individual pixels 8 X 8
per max7219 chip. In the lambda you’re passed a variable called it as with all other displays. Some “Special”
commands have been added to the basic display set.
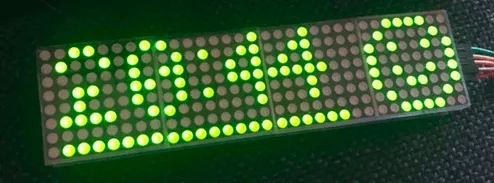
display:  - platform: max7219digit    cs_pin: D8    num_chips: 4    lambda: |-      it.strftime(0, 0, id(digit_font), "%H:%M", id(hass_time).now());      it.image(24, 0, id(my_image));      it.line(1, 7, 21, 7);font:  - file: "pixelmix.ttf"    id: digit_font    size: 6
time:  - platform: homeassistant    id: hass_time
image:  - file: "smile.png"    id: my_image
This is roughly the code used to display the MAX7219 pictured in the image.
Font usage
Section titled “Font usage”Because 8x8 matrix displays has a limited height of 8 pixels only, the use of TrueType fonts for displaying text is not recommended. While rendering the single characters easily unattractive artifacts will occur. Bitmap-based fonts in bdf format are more suitable. For example 5x7.bdf or 5x8.bdf
Scrolling
Section titled “Scrolling”By default the MAX7219Digit display has scroll enabled. The parameters can be set in the YAML file. They can also be changed in the Lambda by adding the following command:
it.scroll(<on/off>, <mode>, <speed>, <delay>, <dwell>);- on/off -> switch scrolling on or off, use true or false
- mode -> max7219digit::CONTINUOUS for continuous scrolling, max7219digit::STOP = Stop at end and reset
- speed -> Set speed of scrolling (ms for every step of one dot)
- delay -> pause time at start of scrolling
- dwell -> pause at end of scrolling (only in mode 1)
display: - platform: max7219digit # ... lambda: |- # ... it.scroll(true, max7219digit::CONTINUOUS, 100, 5000, 1500); // OR it.scroll(true, max7219digit::CONTINUOUS); // OR it.scroll(true);- The screen does not scroll if the text fits within the screen.
printdigit("...")andprintdigitf("...")the alternative way of displaying text does not scroll
Screen inversion
Section titled “Screen inversion”display: - platform: max7219digit # ... lambda: |- it.invert_on_off(true); // Print Hello at position 0 (left) it.print(0,0, id(digit_font), "Hello!");The function it.invert_on_off(true); will invert the display. So background pixels are on and texts pixels are
off. it.invert_on_off(false); sets the display back to normal. In case no argument is used: it.invert_on_off();
the inversion will toggle from on to off or visa versa. This will happen every time the display is updated.
So a blinking effect is created. The background pixels are only set at the next update, the pixels drawn in
the various function like print, line, etc. are directly influenced by the invert command.
display: - platform: max7219digit # ... lambda: |- it.invert_on_off(true); // Print Hello at position 0 (left) it.print(0,0, id(digit_font), "Hello!"); it.line(0, 0, 31, 7, COLOR_OFF);This code will only affect the line drawn on the screen. The line will wipe the pixels from top left to right bottom. The background is not affected.
Screen intensity
Section titled “Screen intensity”The intensity of the screen can be set “dynamically” within the lambda code with the following command: it.intensity(0 .. 15 ).
display: - platform: max7219digit # ... lambda: |- it.intensity(10);Screen ON/OFF
Section titled “Screen ON/OFF”The display can be switched on and off “dynamically” within the lambda code with the following command: it.turn_on_off(true or false).
display: - platform: max7219digit # ... lambda: |- it.turn_on_off(true);For a quick display some additional commands are embedded in the code with a related 8 pixel font. Three methods
(printdigit, printdigitf and strftimedigit ) can be used for displaying characters. Each 8 X 8 grid is used to
display a single character. So not very space efficient. The format of the command is: it.printdigit("1234"); or
it.printdigitf("%s","1234") ;
Please see Formatted Text for a quick introduction into the printf formatting rules and
Displaying Time for an introduction into the strftime time formatting.