Web Server Component
The web_server component creates a simple web server on the node that can be accessed
through any browser and a simple REST API. Please note that enabling this component
will take up a lot of memory and may decrease stability, especially on ESP8266.
To navigate to the web server in your browser, either use the IP address of the node or
use <node_name>.local/ (note the trailing forward slash) via mDNS.
# Example configuration entryweb_server: port: 80Configuration variables
Section titled “Configuration variables”-
port (Optional, int): The port the web server should open its socket on.
-
css_url (Optional, url): The URL that should be used for the CSS stylesheet. Defaults to https://oi.esphome.io/v1/webserver-v1.min.css (updates will go to
v2,v3, etc). Can be set to empty string. -
css_include (Optional, local file): Path to local file to be included in web server index page. Contents of this file will be served as
/0.cssand used as CSS stylesheet by internal webserver. Useful when building device without internet access, where you want to use built-in AP and webserver. -
js_url (Optional, url): The URL that should be used for the JS script. Defaults to https://oi.esphome.io/v1/webserver-v1.min.js. Can be set to empty string.
-
js_include (Optional, local file): Path to local file to be included in web server index page. Contents of this file will be served as
/0.jsand used as JS script by internal webserver. Useful when building device without internet access, where you want to use built-in AP and webserver. -
auth (Optional): Enables HTTP authentication with a username and password.
-
username (Required, string): The username to use for authentication.
-
password (Required, string): The password to check for authentication.
-
type (Optional, string): The HTTP authentication scheme. Both show the same login prompt in the browser; the difference is on the network. One of:
basic(default): Sends the password in an easily reversible (Base64) form on every request.digest: Sends only hashes, keeping the password off the network. Recommended.
The default is currently
basicbut will change todigestin ESPHome2027.1.0; settype: basicexplicitly to keep it after that release. When usingdigest, REST API clients must request it too (for example,curl --digest); plainbasicclients are rejected.
-
-
include_internal (Optional, boolean): Whether
internalentities should be displayed on the web interface. Defaults tofalse. -
enable_private_network_access (Optional, boolean): Enables support for Private Network Access and the Private Network Access Permission Prompt. Defaults to
true. -
log (Optional, boolean): Turn on or off the log feature inside webserver. Defaults to
true. -
ota (Optional, boolean): Explicitly disable OTA updates through the web server interface. Only accepts
false. This option is typically used when you have bothweb_serverandcaptive_portalconfigured, and you want OTA updates to be available only through the captive portal. Sincecaptive_portalautomatically loads the web server OTA platform, setting this tofalseprevents OTA access through the regular web interface while maintaining it for captive portal access. To enable OTA for web server, use theweb_serverOTA platform instead. -
id (Optional, ID): Manually specify the ID used for code generation.
-
local (Optional, boolean): Include supporting javascript locally allowing it to work without internet access. Defaults to
false. -
compression (Optional, string): The compression algorithm used for embedded web assets when
localis enabled. Options aregziporbr(Brotli). Brotli provides smaller embedded web assets (~10% smaller than gzip), but some browsers only support Brotli over HTTPS connections. Since ESPHome devices typically serve over HTTP, gzip is recommended for maximum compatibility. Defaults togzip. -
version (Optional, string):
1,2or3. Version 1 displays as a table. Version 2 uses web components and has more functionality. Version 3 uses HA-Styling. Defaults to2. Version 1 is deprecated and will be removed in 2027.1.0; please migrate to version 2 (the default) or version 3. -
sorting_groups (Optional, list): Available only on
version: 3. A list of group ID’s and names to group the entities. See Webserver Entity Grouping.- id (Required, ID): Manually specify the ID used for the group.
- name (Required, string): A string representing the group name which is displayed as the header of the group
- sorting_weight (Optional, float): A float representing the weight of the group. A group with a smaller
sorting_weightwill be displayed first. Defaults to50
To conserve flash size, the CSS and JS files used on the root page to show a simple user
interface are externally hosted at oi.esphome.io. If you want to use your own service, use the
css_url and js_url options in your configuration.
NOTE
OTA Updates via Web Interface
The ota option has been moved from the web_server component to its own OTA platform.
To enable OTA updates through the web interface, use the new web_server OTA platform:
# Enable OTA updates via web interfaceota: - platform: web_serverTo explicitly disable OTA updates for the web server while keeping them enabled for captive portal (useful when captive portal is configured since it automatically enables web server OTA):
# Disable OTA updates for web_server only# Captive portal will still have OTA access since it auto-loads the web server OTA platformweb_server:  ota: false
captive_portal:  # This component automatically enables OTA
See Web Server for more information.
Security
Section titled “Security”The web server exposes an HTTP API for viewing and controlling your device’s entities. When the
web_server OTA platform is enabled, it can also update firmware.
WARNING
The web server has no cross-site protections, by design. It performs no CSRF, Origin, or Referer checks and uses
a permissive CORS policy, so it can be called from other origins, including a web page you open while on the same
network as the device. Its only access controls are the auth: option and the network the device is on. Treat it as
an open control surface unless you enable auth:.
Recommendations:
- Enable
auth:if the device is on a network you do not fully trust. - Keep devices on a trusted, segmented network and never expose the web server to the internet. See Security Best Practices.
- If web OTA is enabled without
auth:, anyone who can reach the device, including cross-origin through your browser, can upload firmware. Protect it with webauth:, disable web OTA when it is not needed (ota: false), or use password-protected native OTA instead.
Whether this cross-origin behavior is a bug is answered by the project threat model: it is intentional and not a defended boundary.
Example configurations
Section titled “Example configurations”Enabling HTTP authentication:
# Example configuration entryweb_server: port: 80 auth: username: !secret web_server_username password: !secret web_server_passwordIMPORTANT
Always enable authentication when using the web server. See the Security Best Practices guide for recommendations.
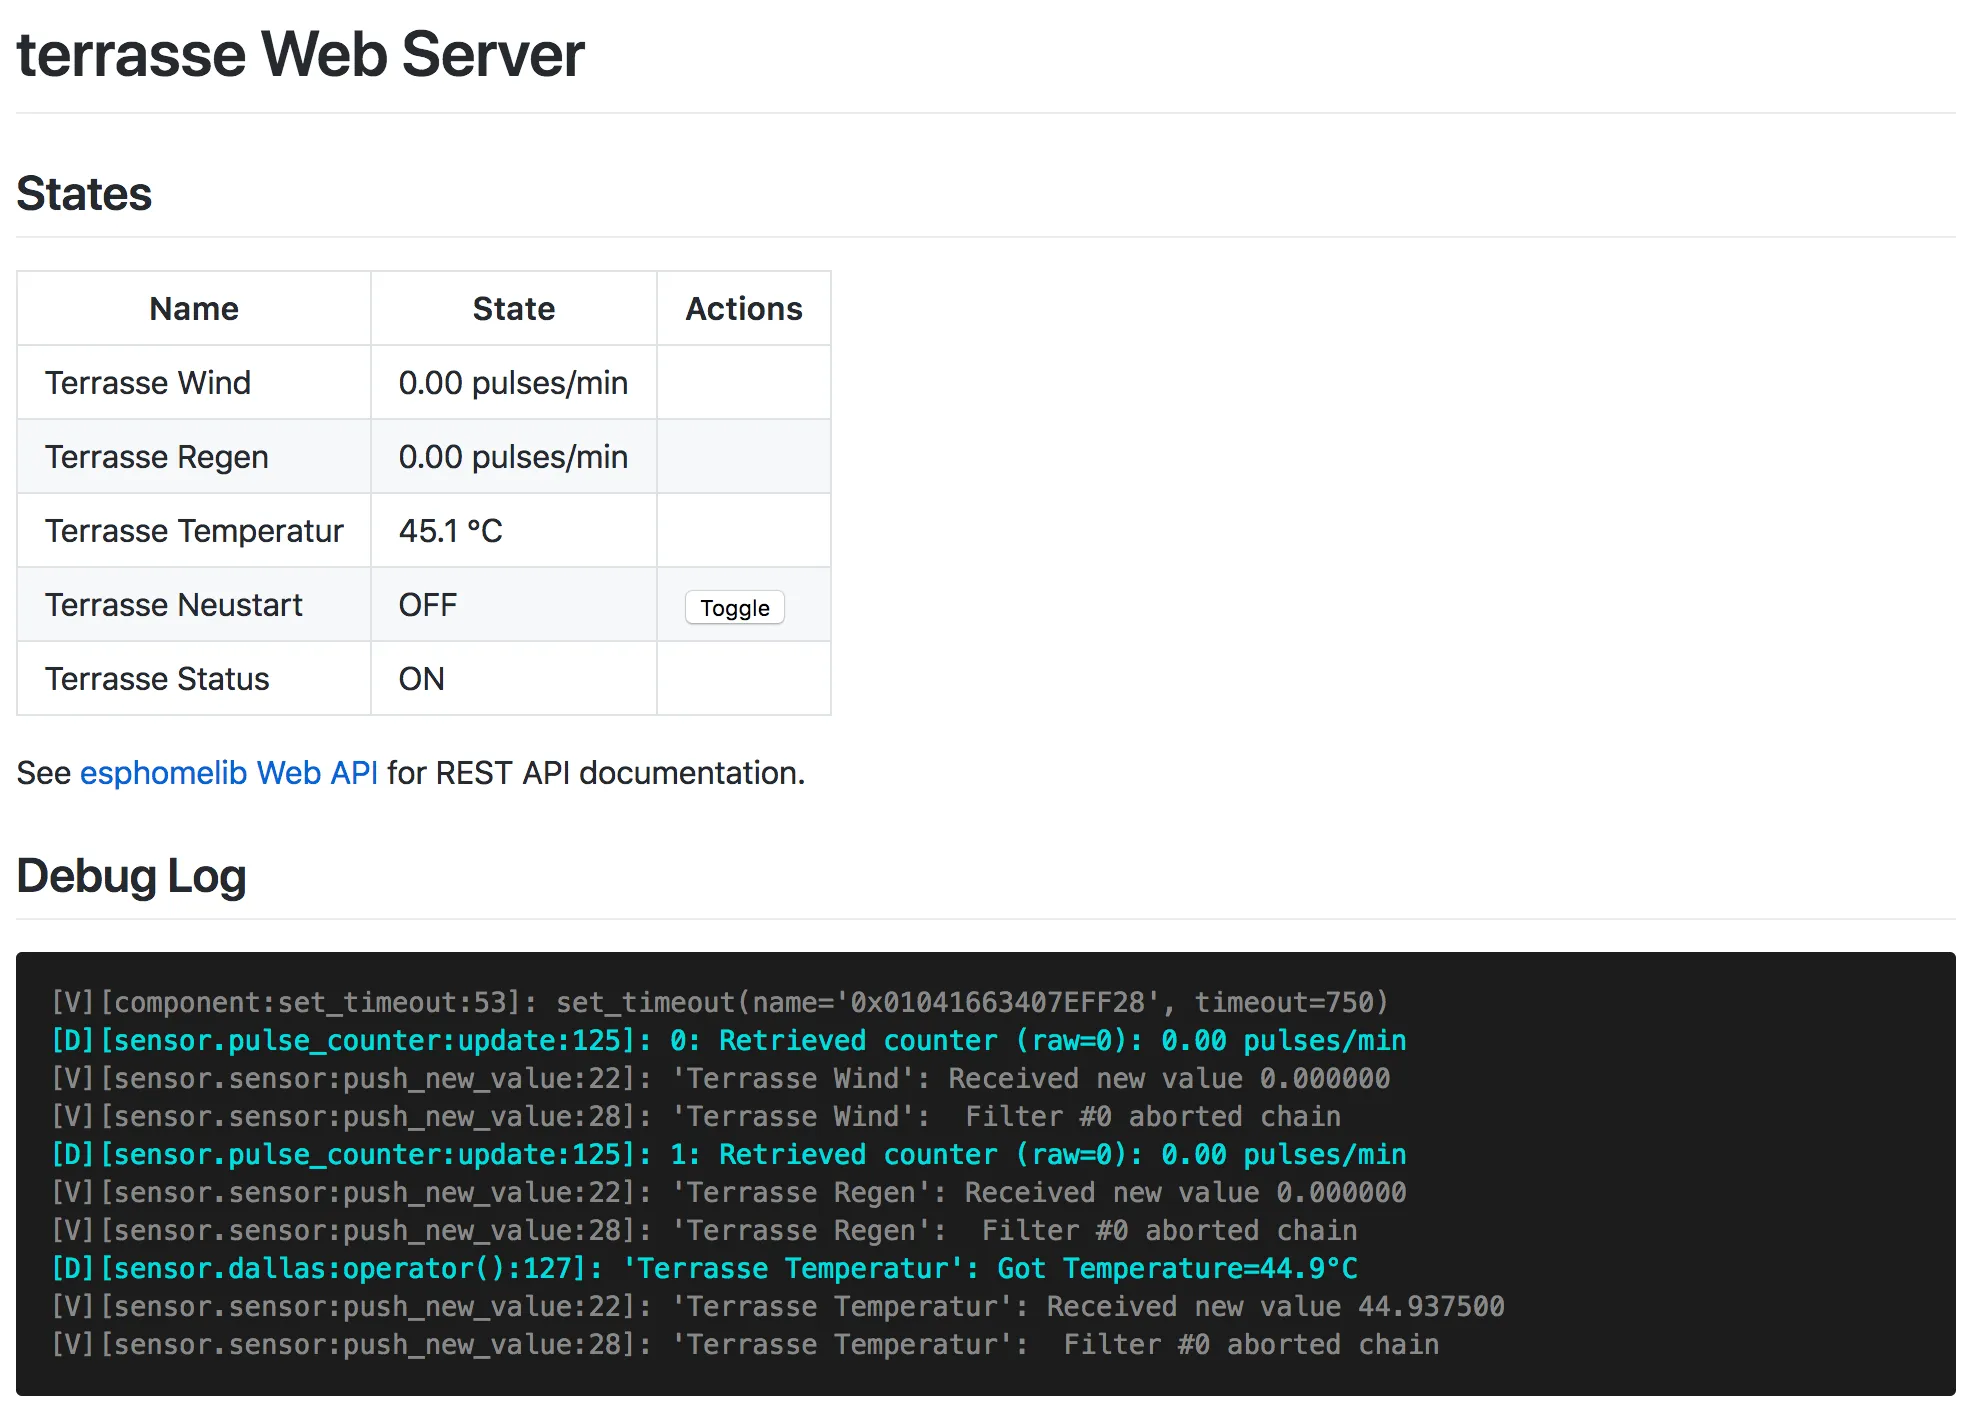
Use version 1 user interface:
WARNING
Version 1 is deprecated and will be removed in 2027.1.0; please migrate to version 2 (the default) or version 3.
# Example configuration entryweb_server: port: 80 version: 1No internet/intranet required on the clients (all assets are inlined, compressed and served from flash):
# Example configuration entryweb_server: local: trueDisabling OTA updates for web server while using captive portal (common security setup):
# Example configuration entryweb_server:  port: 80  ota: false  # Disables OTA through regular web interface
# Captive portal automatically enables web server OTA platform# OTA will only be accessible when captive portal is activecaptive_portal:
Advanced usage
Section titled “Advanced usage”The following assume copies of the files with local paths - which are config dependent.
Example web_server version 1 configuration with CSS and JS included from a local folder.
CSS and JS URL’s are set to empty value, so no internet access is needed for this device to show it’s web interface.
web_server: port: 80 version: 1 css_include: "<some_folder>/webserver-v1.min.css" css_url: "" js_include: "<some_folder>/webserver-v1.min.js" js_url: ""Example web_server version 2 configuration with JS included from a local file.
CSS and JS URL’s are set to empty value, so no internet access is needed for this device to show it’s web interface.
V2 embeds the css within the js file so is not required, however you could include your own CSS.
# Example configuration entry v2web_server: js_include: "./v2/www.js" js_url: "" version: 2Copy https://oi.esphome.io/v2/www.js to a V2 folder in your yaml folder.
Version 3 features
Section titled “Version 3 features”Entity sorting
Section titled “Entity sorting”Version 3 supports the sorting of the entities.
You can set a sorting_weight on each entity.
Smaller numbers will be displayed first, defaults to 50.
My Sensor 2 is displayed before My Sensor 1
Example configuration:
sensor: - platform: template name: "My Sensor 1" web_server: sorting_weight: 10 - platform: template name: "My Sensor 2" web_server: sorting_weight: -1Entity grouping
Section titled “Entity grouping”Version 3 of the web_server allows for grouping of entities in custom groups.
Groups can be sorted by providing a sorting_weight. Groups with a smaller sorting_weight will be displayed first.
If you don’t provide a web_server_sorting_group on the component, the entity_category will be used as the group.
Example configuration:
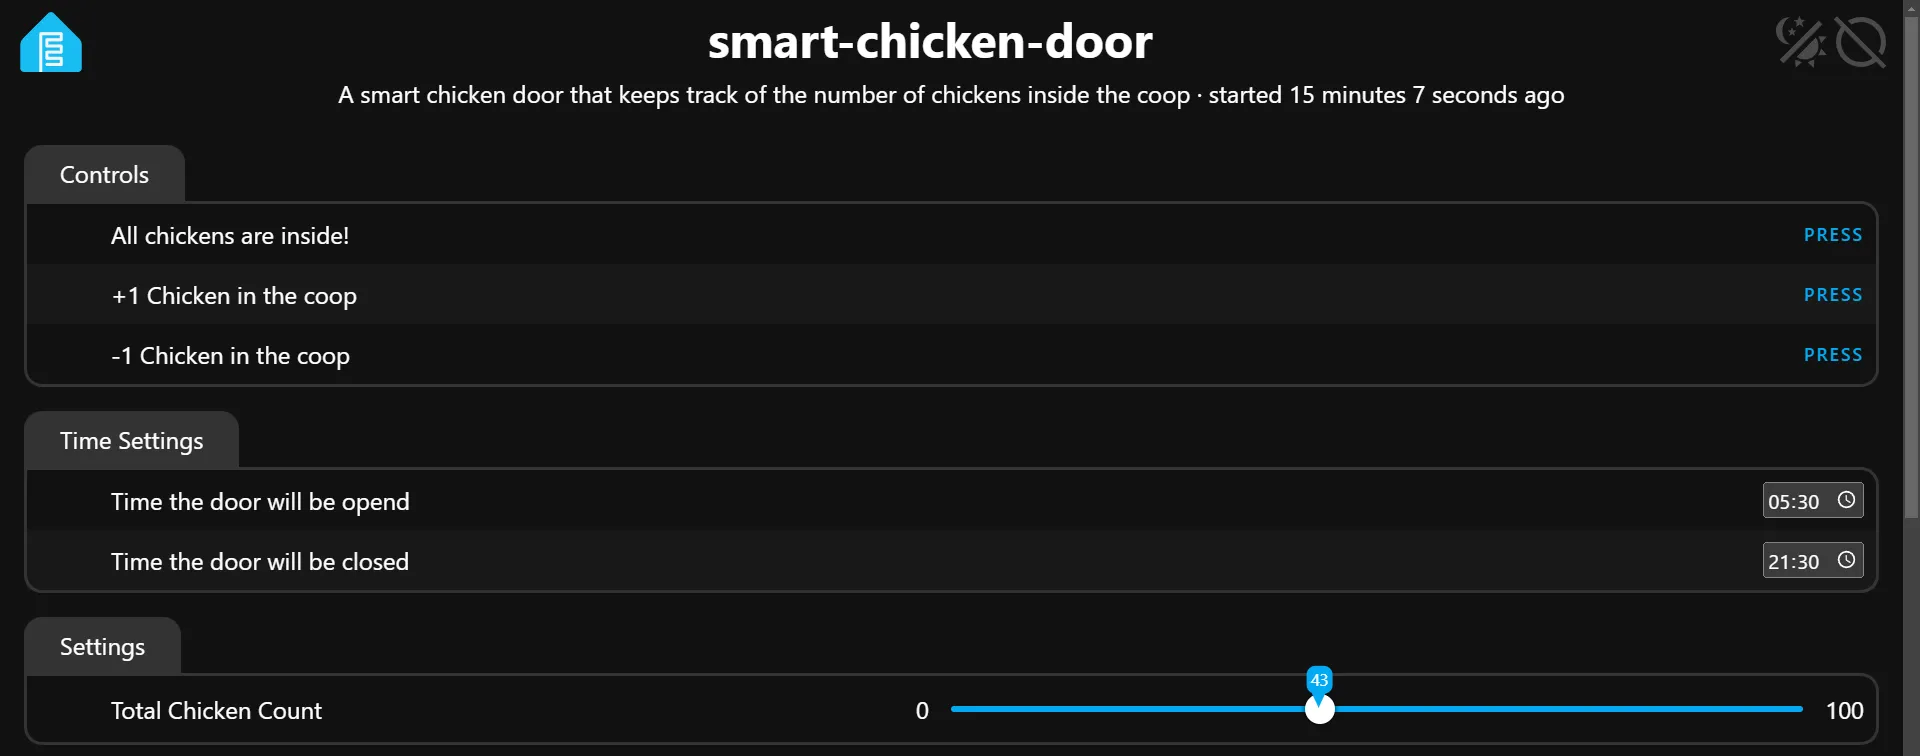
web_server:  version: 3  sorting_groups:    - id: sorting_group_time_settings      name: "Time Settings"      sorting_weight: 10    - id: sorting_group_number_settings      name: "Number settings"      sorting_weight: 20
datetime:  - platform: template    ...    web_server:      sorting_group_id: sorting_group_time_settings
number:  - platform: template  ...    web_server:      sorting_group_id: sorting_group_number_settings
Number in slider mode
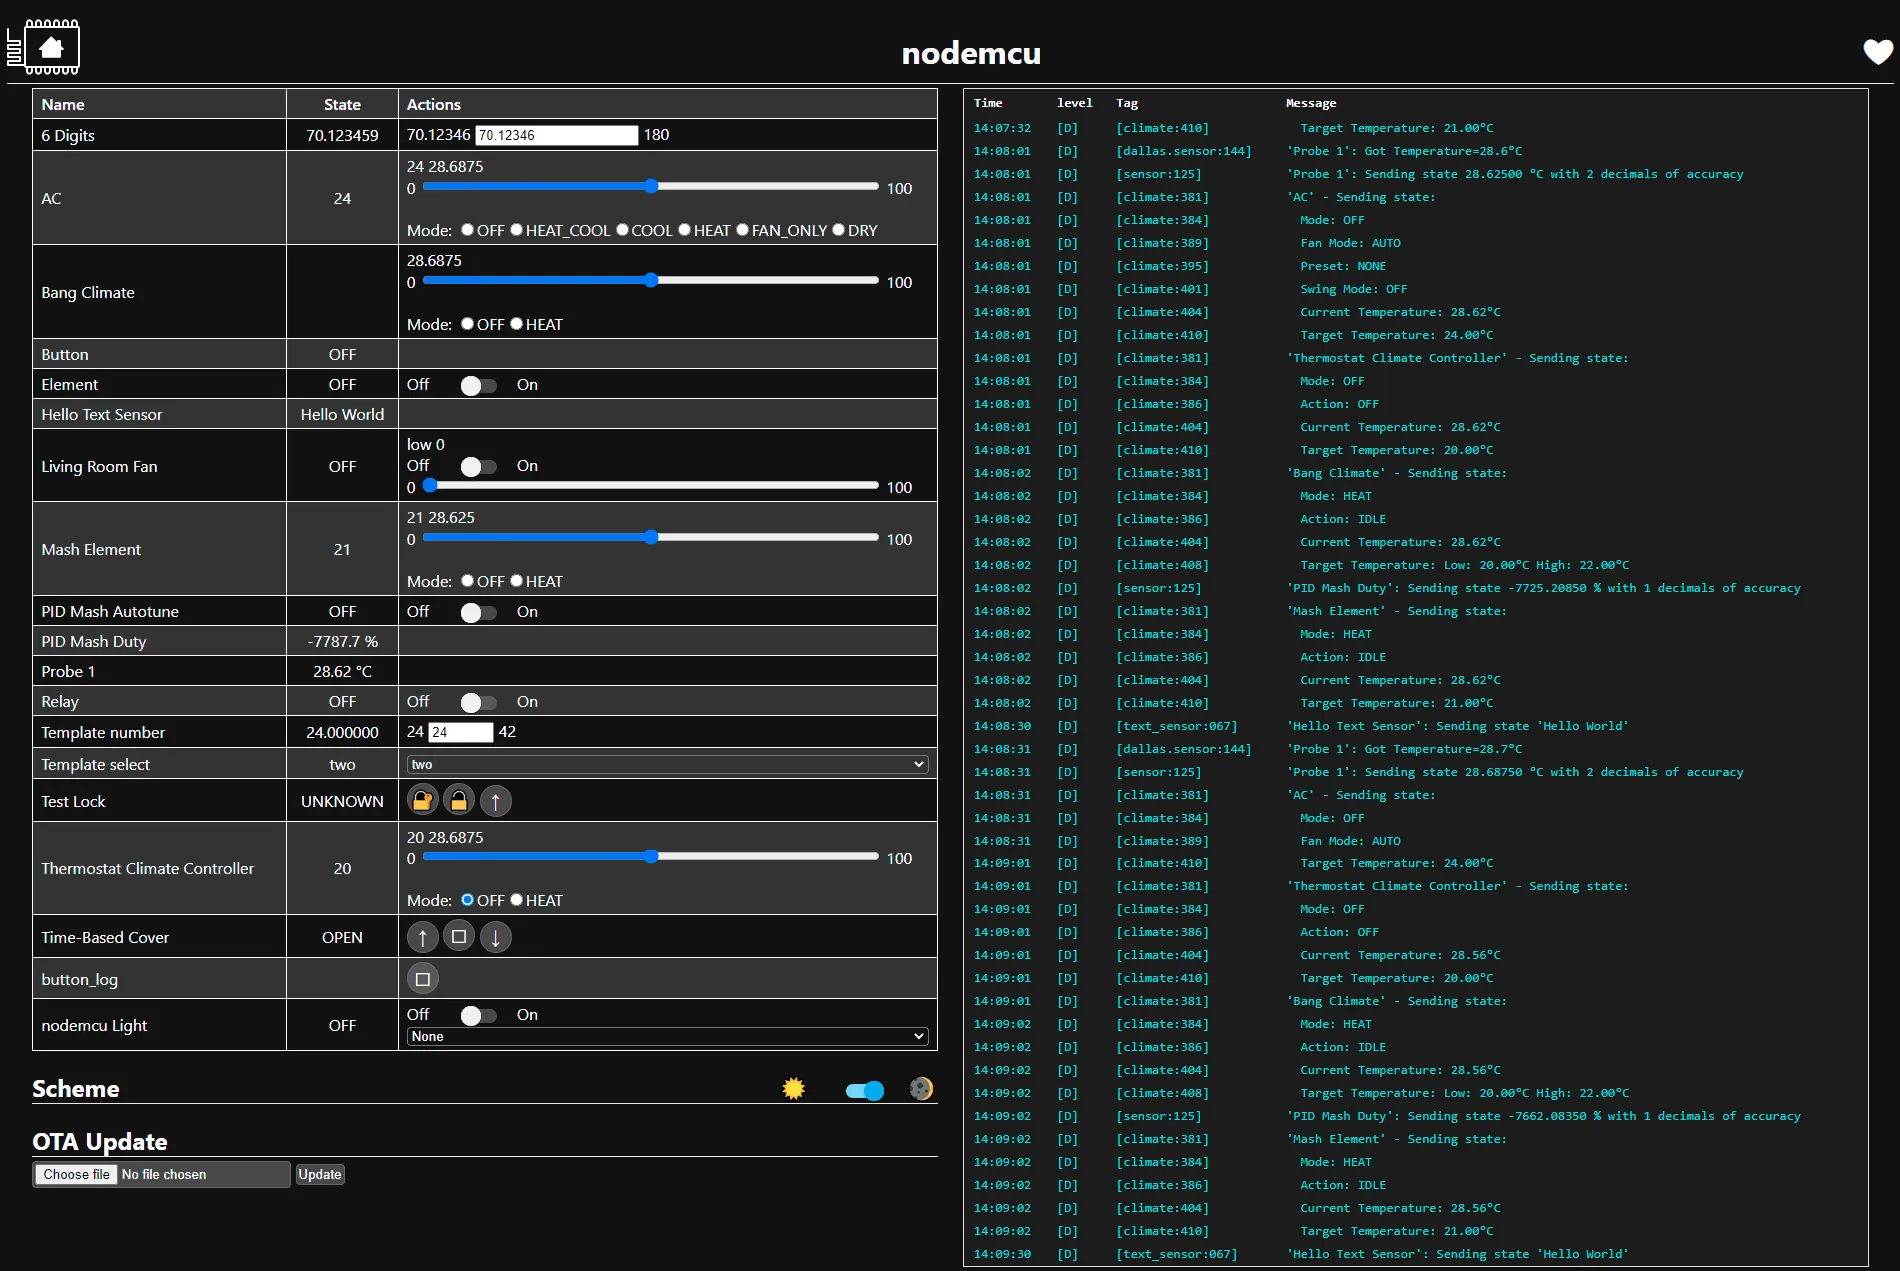
Section titled “Number in slider mode”
You can change the value by moving the slider. If you wish to enter a precise number you can click and hold the current value. A popup input field will appear where you can enter a number and confirm your input by pressing the enter key.

Expand Controls and Logs
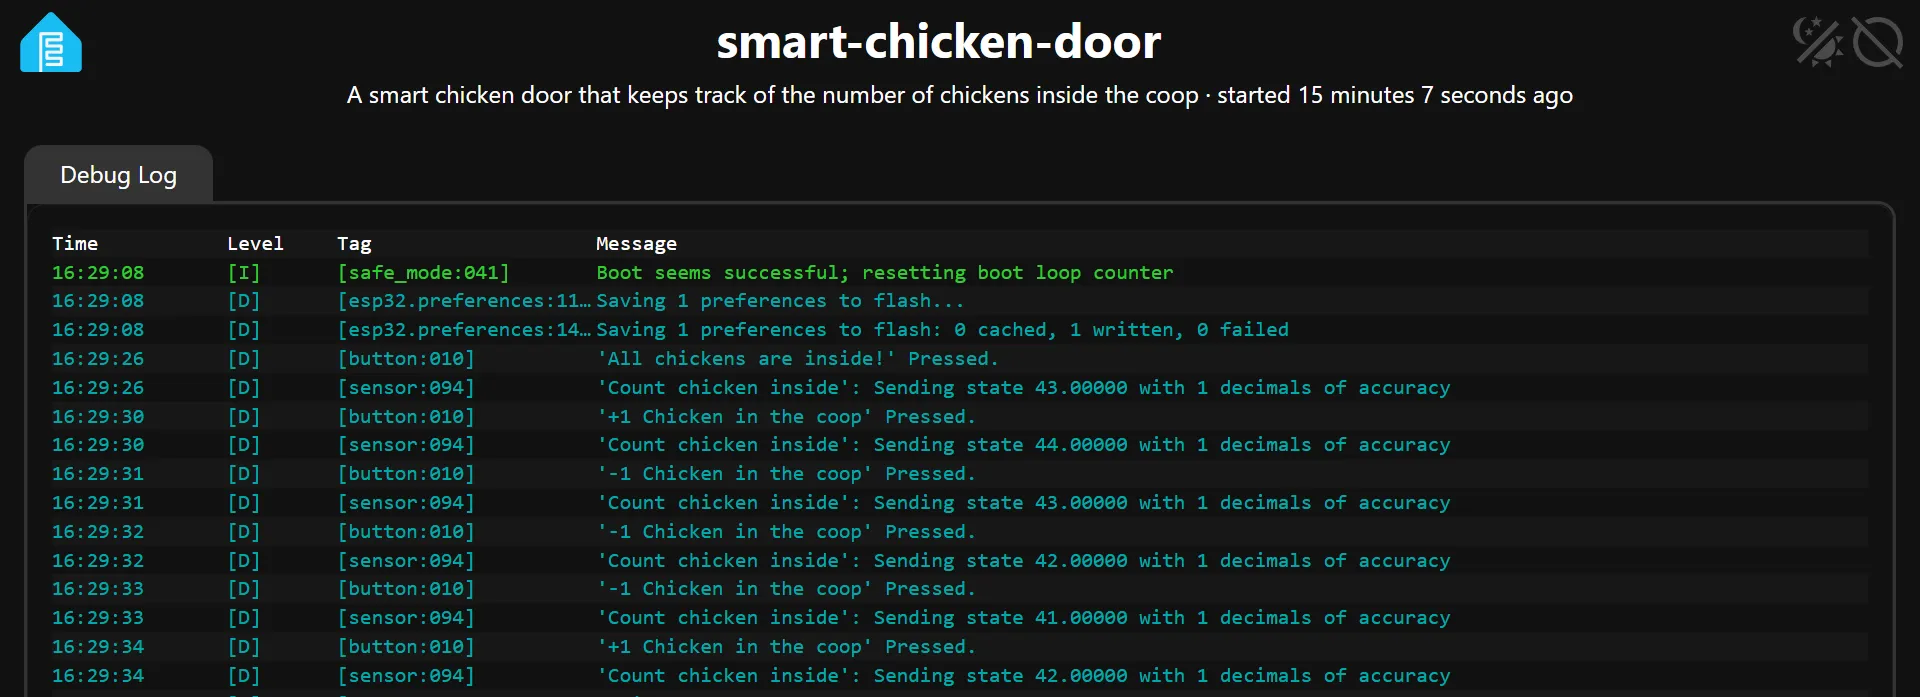
Section titled “Expand Controls and Logs”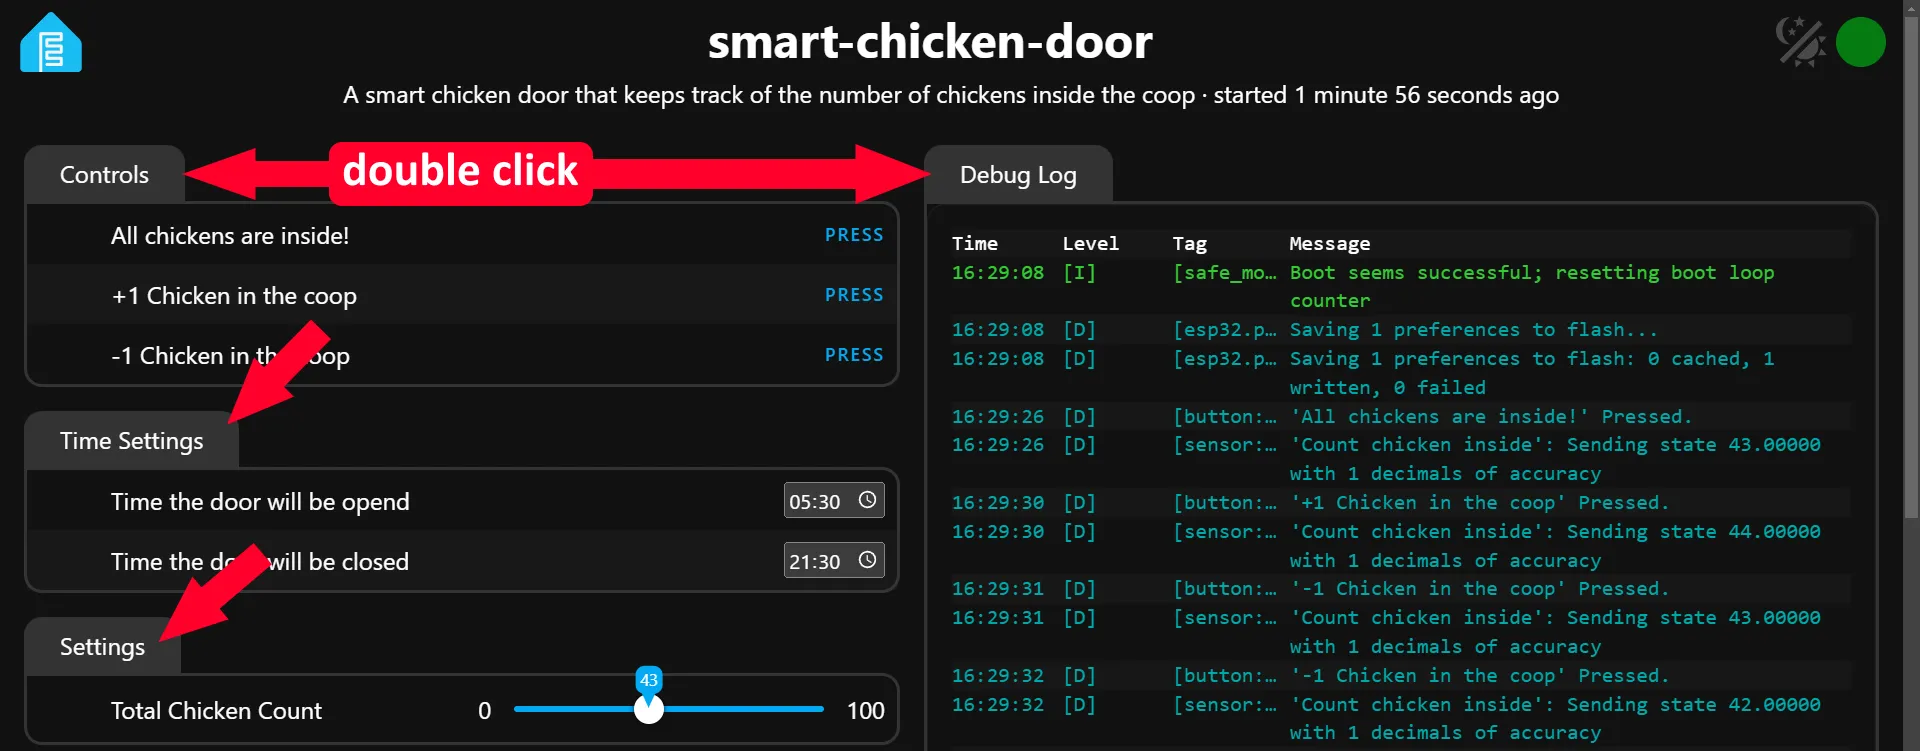
By double-clicking on any group header you can expand the controls to fill up the whole screen. You can do the same for the logs.
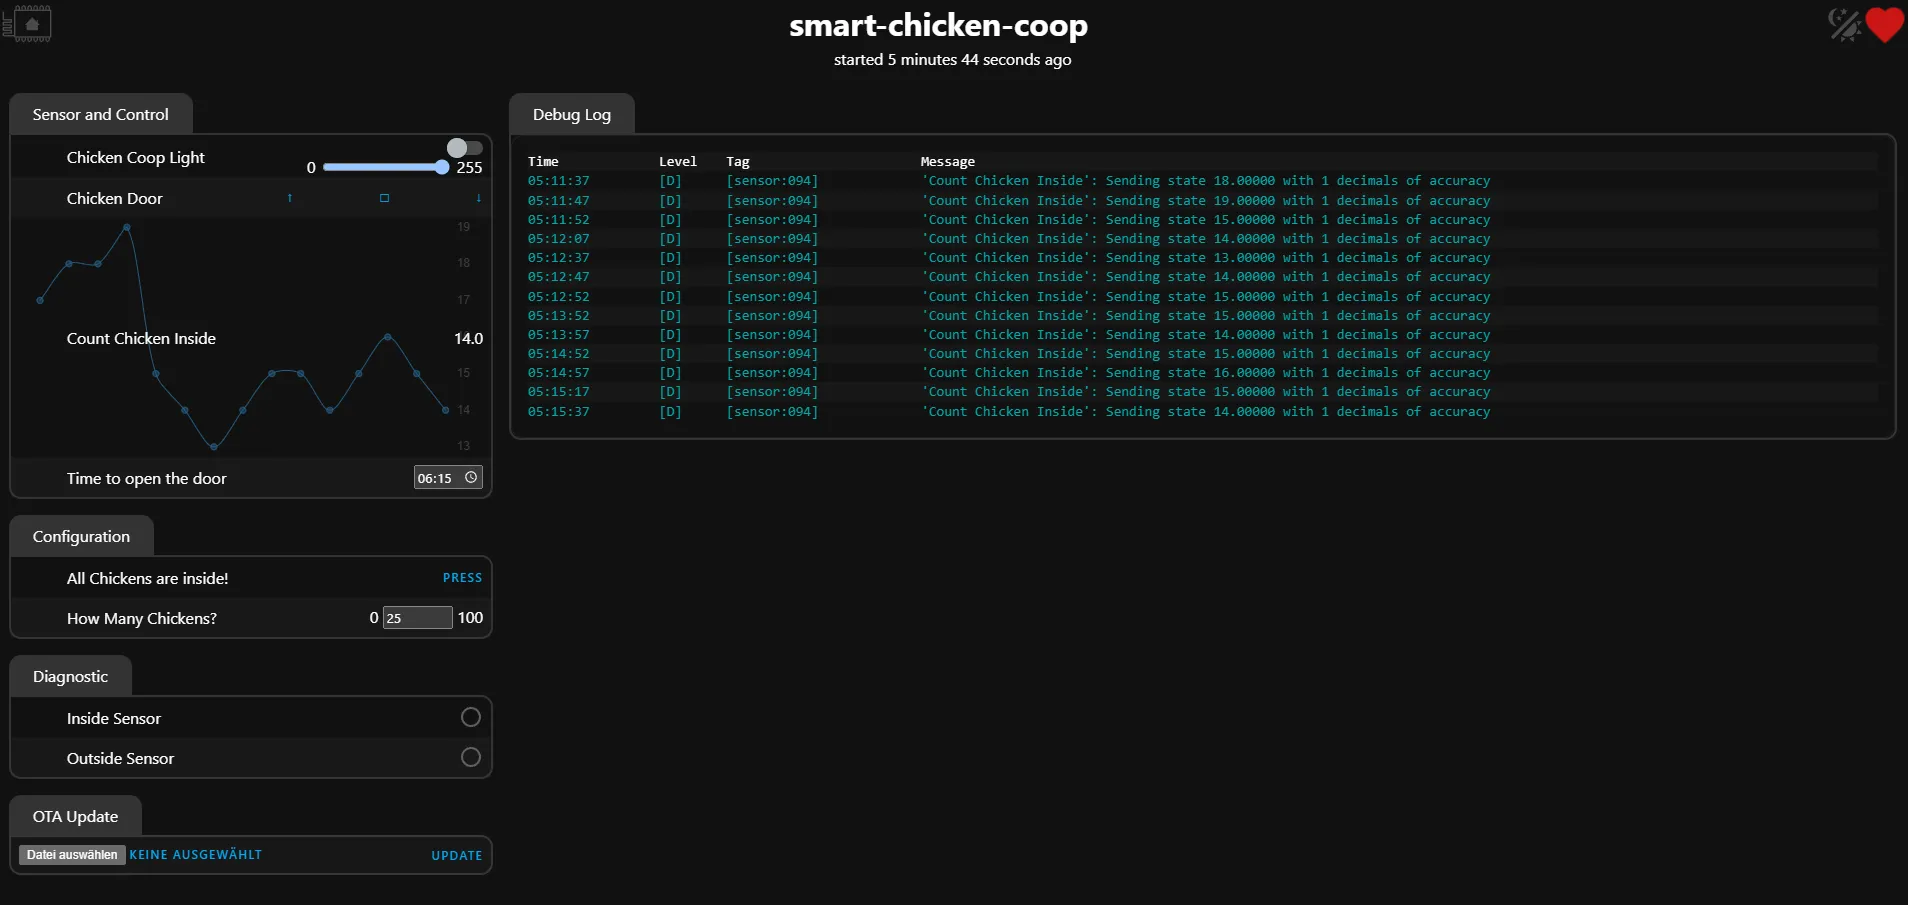
Sensor value graph
Section titled “Sensor value graph”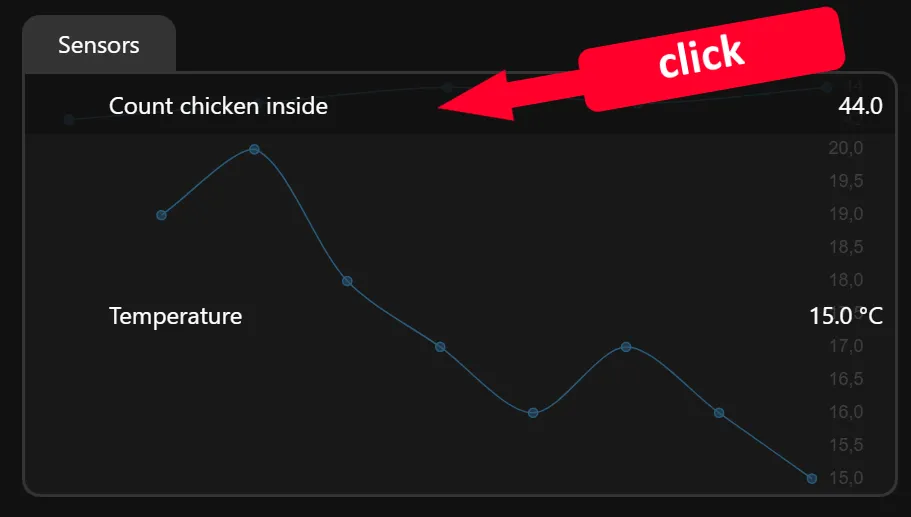
By clicking on any sensor it will expand a graph with the historical values for that sensor.