Time & Temperature on OLED Display
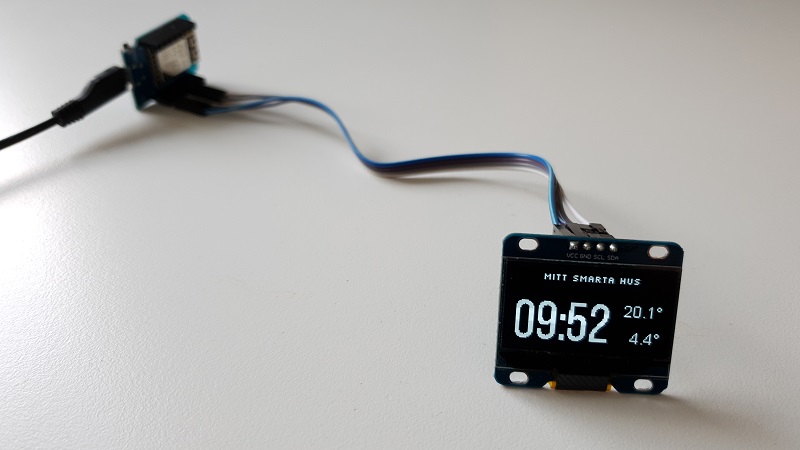
In this example I have used a SSD1306 OLED Display over I²C to show current time and two different temperature values from Home Assistant.
ESPHome has support for several different types of displays. The display used here is 1.3" with 128x64 monochrome pixels
(SH1106 128x64).
Hardware configuration

Hardware is easy! Only four connections are needed:
VCC- Power (my display could use either 3.3V or 5V)GND- GroundSDA- Serial DataSCL- Serial Clock
⚠️ Warning
Ensure your display handles 5V if you use that.
Software configuration
Getting Time
Get the time from Home Assistant to sync the onboard real-time clock.
time:
  - platform: homeassistant
    id: esptime
Getting Temperature
Next, we want to get one temperature sensor and the weather forecast imported from Home Assistant.
I named them inside_temperature and outside_temperature. You will use those references later.
By adding internal: true to the sensors they won’t be published back to Home Assistant.
sensor:
  - platform: homeassistant
    id: inside_temperature
    entity_id: REPLACEME
    internal: true

  - platform: homeassistant
    id: outside_temperature
    entity_id: REPLACEME
    internal: true

text_sensor:
  - platform: homeassistant
    id: outside_temperature_unit
    entity_id: REPLACEME
    attribute: temperature_unit
    internal: true
Define the Fonts
- TrueType fonts are used. If you ever worked with fonts on microcontrollers you will love this!
- Save font files in
/config/esphomefolder where your ESPHome configuration is stored. - The
.ttfsuffix must be lowercase and of course match your filename. - Selection of fonts can be a little bit tricky for small sizes to look good. Experiment and share your findings in the comments below!
font:
  - file: 'slkscr.ttf'
    id: small
    size: 8

  - file: 'BebasNeue-Regular.ttf'
    id: medium
    size: 48

  - file: 'arial.ttf'
    id: large
size: 14- (Optional) You can also use Google fonts with the
gfonts://scheme instead of including font files. - Find out more in the Font Renderer Component documentation.
font:
  - file: "gfonts://Silkscreen"
    id: small
    size: 10
  - file: "gfonts://Roboto"
    id: large
    size: 24
  - file: "gfonts://Silkscreen"
    id: medium
    size: 15
Display Definition
Now setup the communication to the display and start fill the screen with live data!
The reset_pin was not used in my hardware configuration as the display didn’t have that pin exposed.
Note your address and model might be different, use the scan option to find the address of your display.
i2c:
  sda: GPIOXX
  scl: GPIOXX
  scan: false
  # manually setting the frequency to a higher rate may avoid long component updates
  # frequency: 300kHz

display:
  - platform: ssd1306_i2c
    model: "SH1106 128x64"
    reset_pin: GPIOXX
    address: 0x3C
    lambda: |-
      it.printf(0, 0, id(small), TextAlign::TOP_LEFT, "Time and");
      it.printf(0, 12, id(small), TextAlign::TOP_LEFT, "Temperature");

      // Print time in HH:MM format
      it.strftime(0, 60, id(large), TextAlign::BASELINE_LEFT, "%H:%M", id(esptime).now());

      // Print inside temperature (from homeassistant sensor)
      if (id(inside_temperature).has_state()) {
        it.printf(127, 23, id(medium), TextAlign::TOP_RIGHT , "%.1f", id(inside_temperature).state);
      }

      // Print outside temperature (from homeassistant weather)
      if (id(outside_temperature).has_state()) {
        it.printf(127, 60, id(medium), TextAlign::BASELINE_RIGHT , "%.1f%s",
                  id(outside_temperature).state, id(outside_temperature_unit).state.c_str());
      }
Rendering
Alignment of text can use different reference points, for example
TOP_RIGHTorBASELINE_LEFT, which all are defined in API Reference .The property
has_state()on a sensor is useful as it can take some seconds to get the data from Home Assistant and you may not want to displayNanRefer to the rendering engine Display Rendering Engine for more features (it can draw lines and circles too!)
Add a Text-Based Sensor
Below follows an example that replaces the “Time and Temperature” top printout with the alarm status from the alarm component in Home Assistant.
text_sensor:
  - platform: homeassistant
    entity_id: alarm_control_panel.my_alarm_system
    name: "Alarm State"
    id: alarm_state

display:
  - platform: ssd1306_i2c
    model: "SH1106 128x64"
    reset_pin: GPIOXX
    address: 0x3C
    lambda: |-
      // Print "Alarm State: <state>" in top center
      it.printf(64, 0, id(small), TextAlign::TOP_CENTER, "Alarm State: %s", id(alarm_state).state.c_str());